
Overview
The Code with AI feature in Softaculous is an AI-powered coding assistant integrated directly into your control panel. It helps you write, debug, refactor, and understand code in your projects without leaving your hosting environment.
Note: This feature is added in Softaculous 6.3.4
Key Features
- Multi-provider support – Connect OpenAI, Anthropic, Google, DeepSeek, Groq, Together AI, OpenRouter, Ollama, MiniMax, and custom OpenAI-compatible providers
- Free tier – OpenCode Zen (Free) is available with no API key required
- Build & Plan modes – Full-access coding or read-only analysis
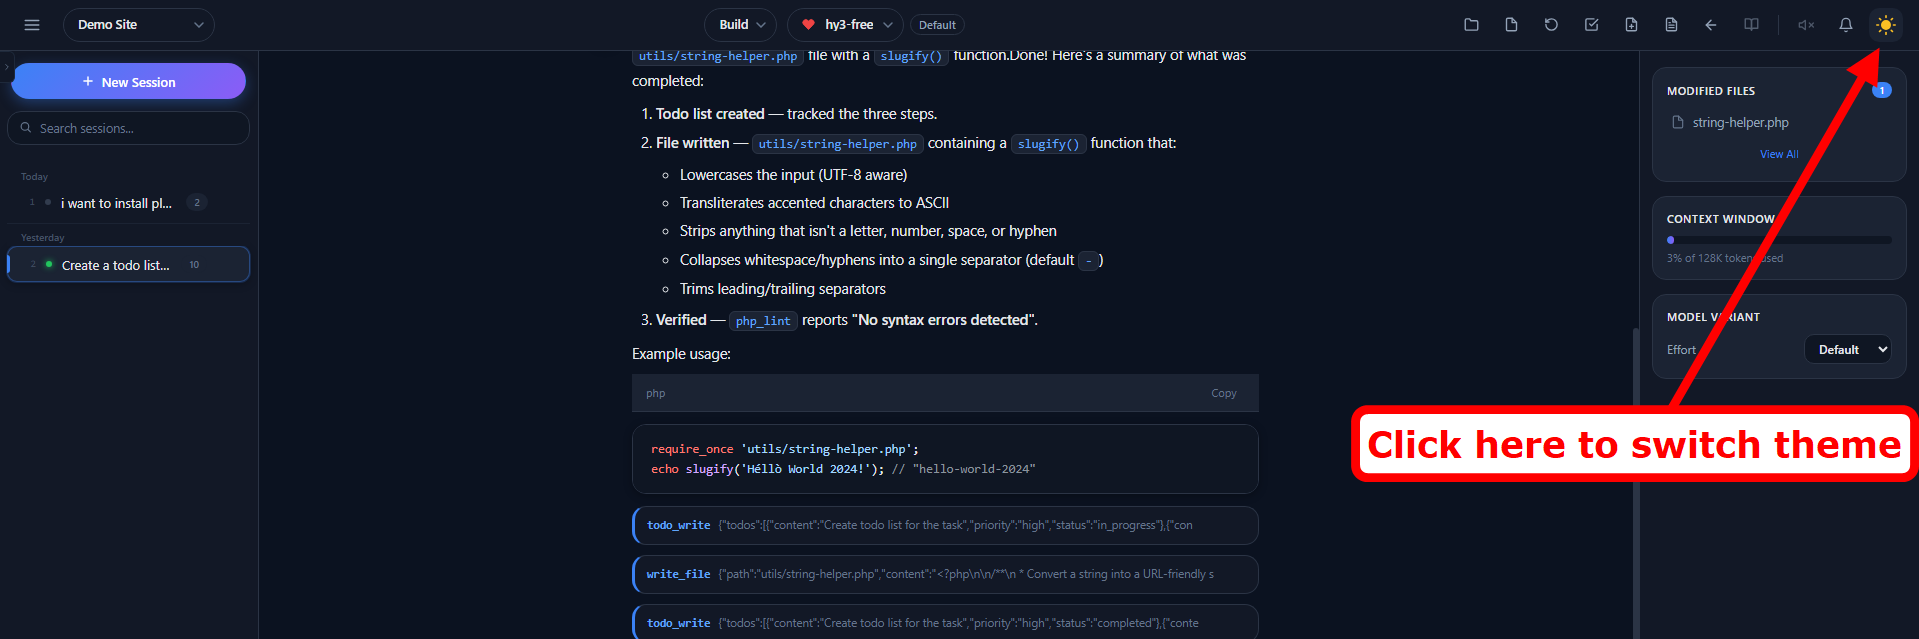
- Dark / Light theme – Toggle with moon/sun icon in the header
- Command Palette – Press
Ctrl+Kto quickly access any command - Slash Commands – 16+ slash commands for quick actions
- Inline Mode Switch – Type
@buildor@planto switch modes inline - Shell Mode – Type
!to run shell commands directly - Session Timeline – Jump-to-message navigation
- Session Search – Search and filter through sessions
- Session Fork/Branch – Explore alternate conversation paths
- Undo/Redo – Undo or redo messages
- Regenerate Response – Re-generate the last AI response
- Edit Previous Messages – Edit any prior user message and re-submit
- Conversation Compact – Summarize long conversations to save context
- Model Favorites – Star your favorite models for quick access
- Model Variants – Adjust reasoning effort (Low/Medium/High)
- Context Window Tracking – Visual bar showing token usage percentage
- Browser Notifications – Browser notifications when tab is not focused
- Sound Notifications – Audio alerts for completion, errors, and questions
- Modified Files Panel – See all files changed by AI in the session
- Task Management – Built-in todo list with checkbox tracking
- Reasoning Display – Toggle thinking blocks (show/collapse/hide)
- Prompt History – Navigate through previous prompts with arrow keys
- Auto-Generated Titles – Sessions get AI-generated descriptive titles
- Customizable Keybindings – Remap any keyboard shortcut
- Project Management – Create and switch between multiple projects
- File Tree Browser – Browse and view project files
- Export as Markdown – Download or copy your conversation
- Permission System – Control tool access (Allow Once, Allow Always, Deny)
- Read & Write Files – AI can read and write files directly in your project directory
- Write Plugins – Generate complete WordPress plugins from scratch with a single prompt
- Make Websites – Create full websites, themes, and templates with AI assistance
- Edit Existing Files – Make targeted changes to existing files without rewriting everything
- Search Files – Find files by name or search content across your entire project
- Debug & Refactor – Identify bugs, fix errors, and refactor code for better structure
- Right Side Panel – Modified Files count, Context Window usage, and Model Variant selector at a glance
- Interactive Question Cards – The AI can pause and ask you questions with clickable options
- Quick Command Chips – One-click shortcuts (/todo, /export, /plan…) under the chat input
- Independent Sessions – Multiple sessions process in parallel without blocking each other
- Session Status Indicators – Red (processing), blue (unread response), green (viewed)
- Alt+1 to Alt+99 – Switch between up to 99 sessions instantly
- Syntax Highlighting – AI-generated code renders with full syntax colors
- Dark Theme by Default – Code with AI now opens in dark mode out of the box
- Close Project – Remove a project from your list without deleting its data
- Delete Project – Permanently erase a project and all its conversations, sessions, and context
Accessing the Code with AI Feature
Log in to Softaculous
- Log in to your hosting control panel (Webuzo, cPanel, DirectAdmin, etc.)
- Navigate to the Softaculous section or icon
- The Softaculous dashboard will open, In the Softaculous header/navigation, look for the Code with AI link
- Click on it to open the AI Assistant interface

Theme (Dark / Light Mode)
Code with AI opens in dark theme by default. You can switch themes anytime using the moon/sun toggle in the header. Your theme preference is saved in your browser and automatically restored across sessions.
- Moon icon (🌙) – Currently in light mode, click to switch to dark
- Sun icon (☀️) – Currently in dark mode, click to switch to light
Setting Up the AI Assistant
Connecting an AI Provider
Free Option:
- OpenCode Zen (Free) – Enabled by default. No API key required.
You can also connect to any other AI provider:
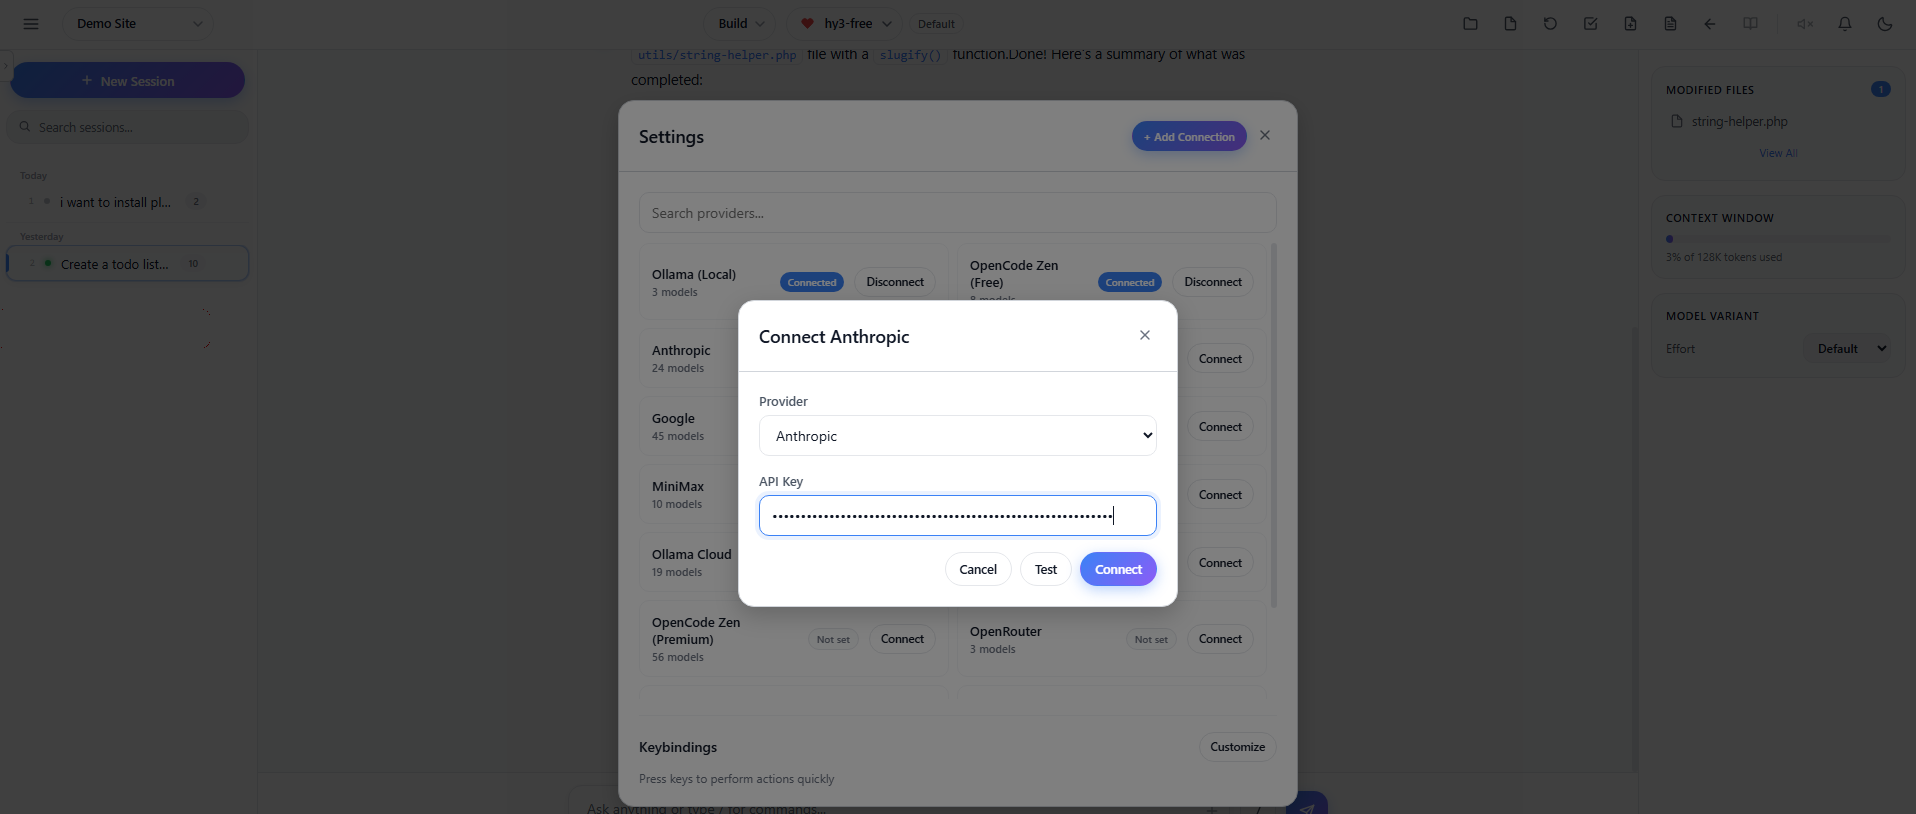
- Click the Settings(⚙️) button in the AI Assistant footer
- Find the provider you want to use and click Connect
- Enter your API key and click Connect
- Use the Test button to verify your connection works
Custom OpenAI-Compatible Providers
Code with AI supports any OpenAI-compatible API endpoint as a custom provider. This means you can connect to self-hosted models, private inference servers, or any third-party API that implements the OpenAI chat completions format (/v1/chat/completions).
How to Add a Custom Provider
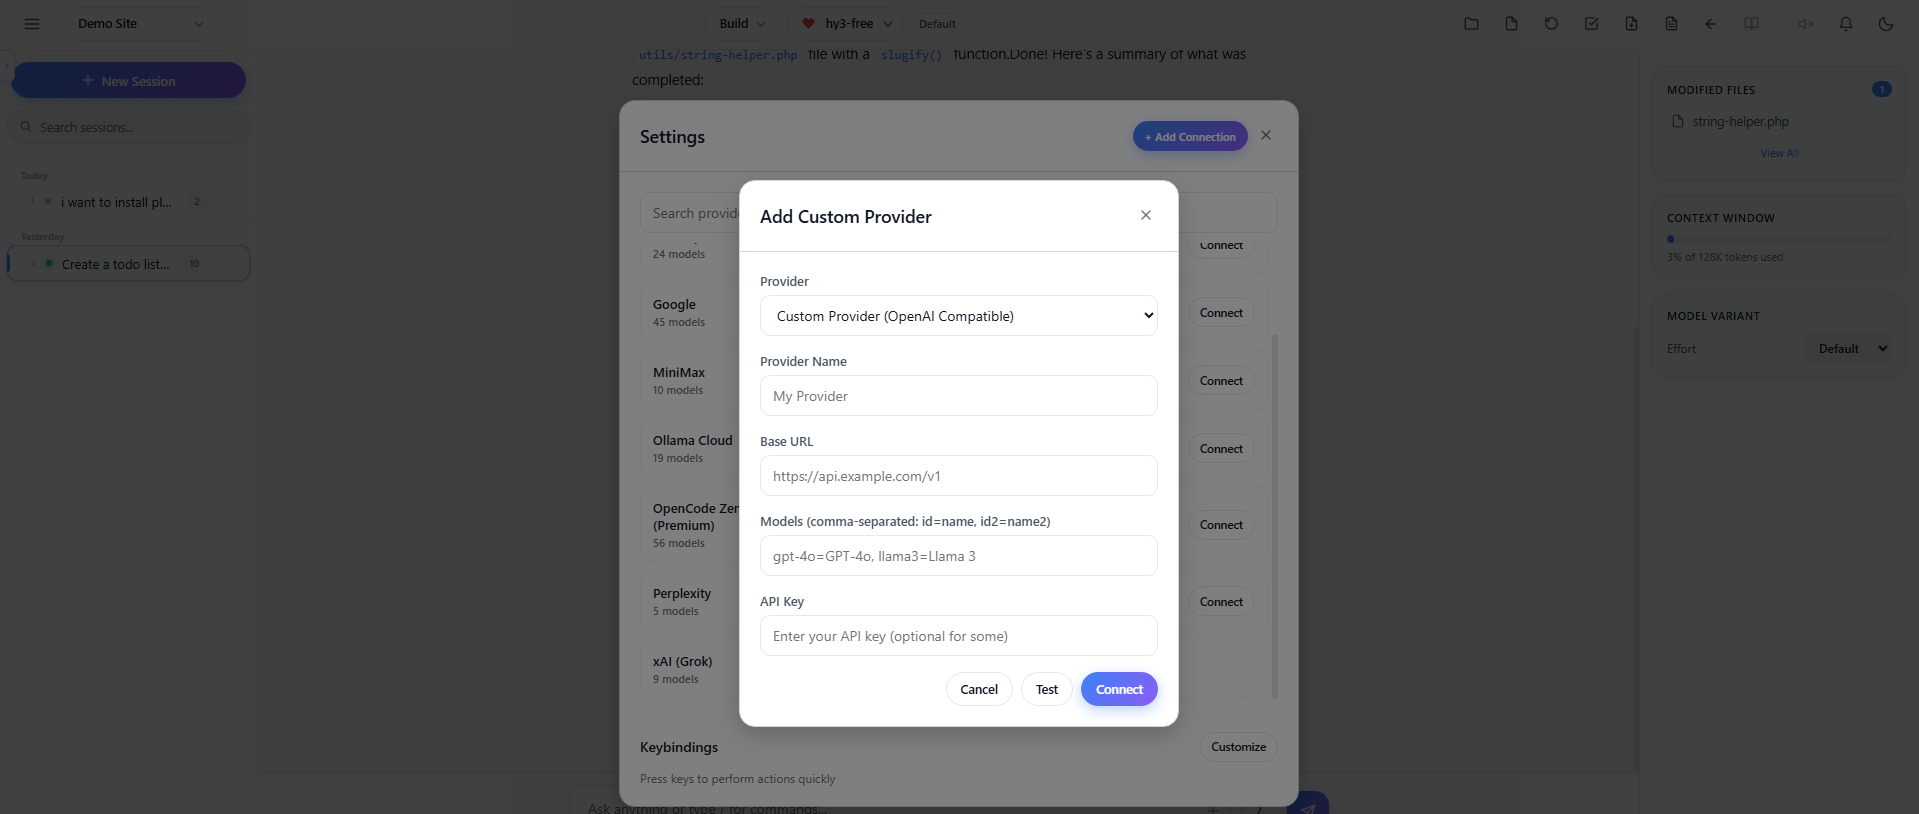
- Open Settings(⚙️) in the Code with AI interface
- Click + Add Custom Provider (OpenAI-compatible)
- A modal opens – Fill in the following fields:
- Provider Name – A custom name for your provider (e.g., “My Local LLM”)
- Base URL – The API endpoint URL (e.g.,
https://api.myhost.com/v1) - API Key – Your API key (if required by the endpoint)
- Models – Comma-separated list of models in
id=nameformat (e.g.,gpt-4o=GPT-4o, llama3=Llama 3)
- Click Test Connection to verify connectivity
- Click Connect to add the provider
Supported AI Providers:
 OpenAI (GPT)
 Anthropic (Claude)
 Google (Gemini)
 DeepSeek
 Groq
Groq
 OpenRouter
 Ollama (local)
 Ollama Cloud
 Azure
Azure
 Amazon Bedrock
 Cloudflare
 Hugging Face
 OpenCode Zen (Free)
 OpenCode Zen Premium
Model Auto-Detection
Models are automatically detected and cached for 24 hours. The system fetches context window limits, output limits, reasoning capabilities, and tool-call support for each model automatically. You do not need to manually configure model metadata.
Selecting an AI Model
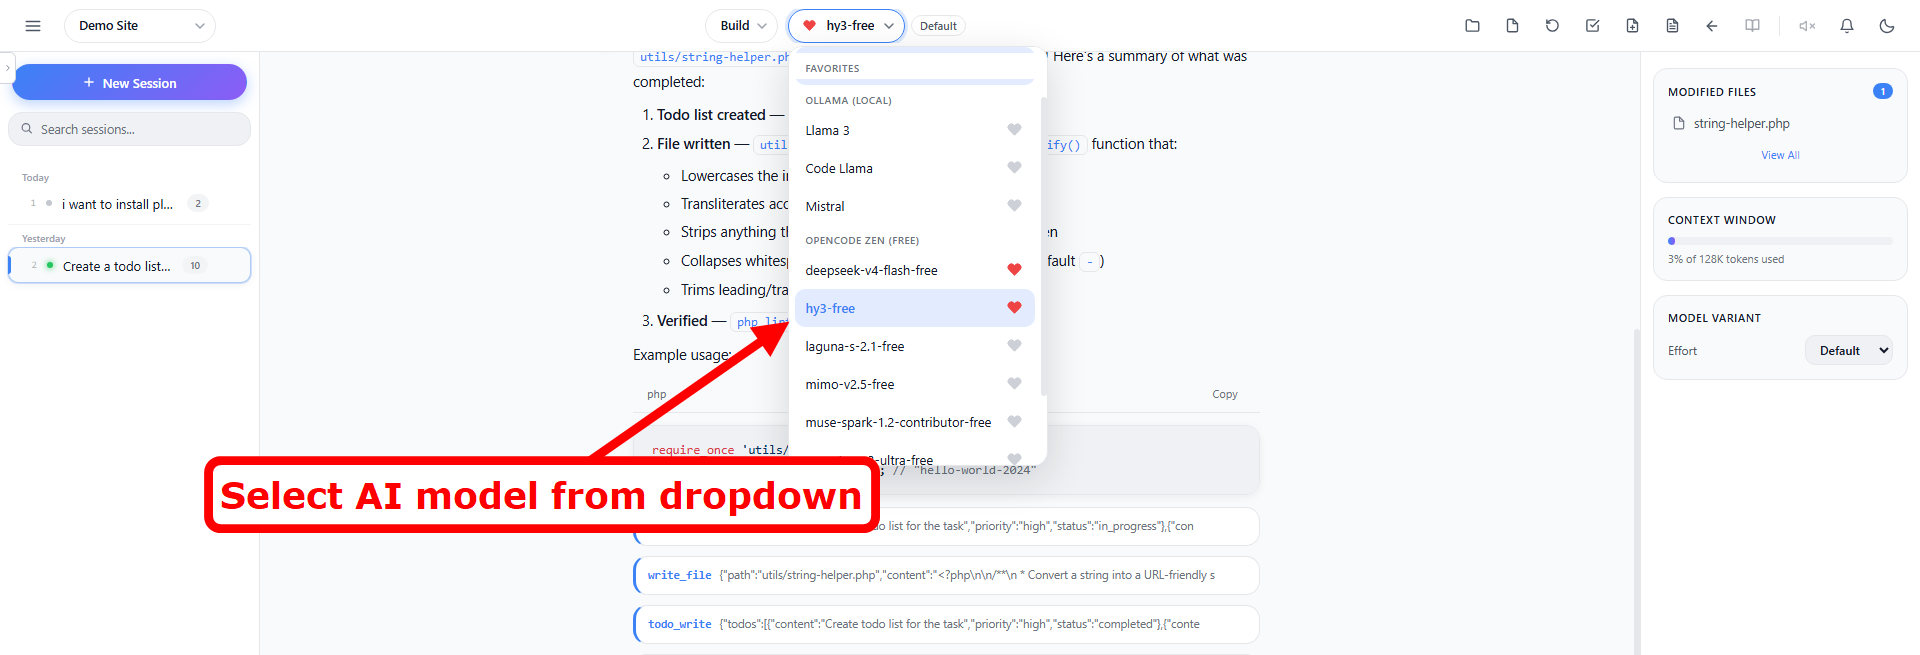
- Once connected, choose an AI model from the custom dropdown in the header
- The dropdown is organized by provider with group headers
- The selected model will be used for all AI interactions in your current session
Model Favorites
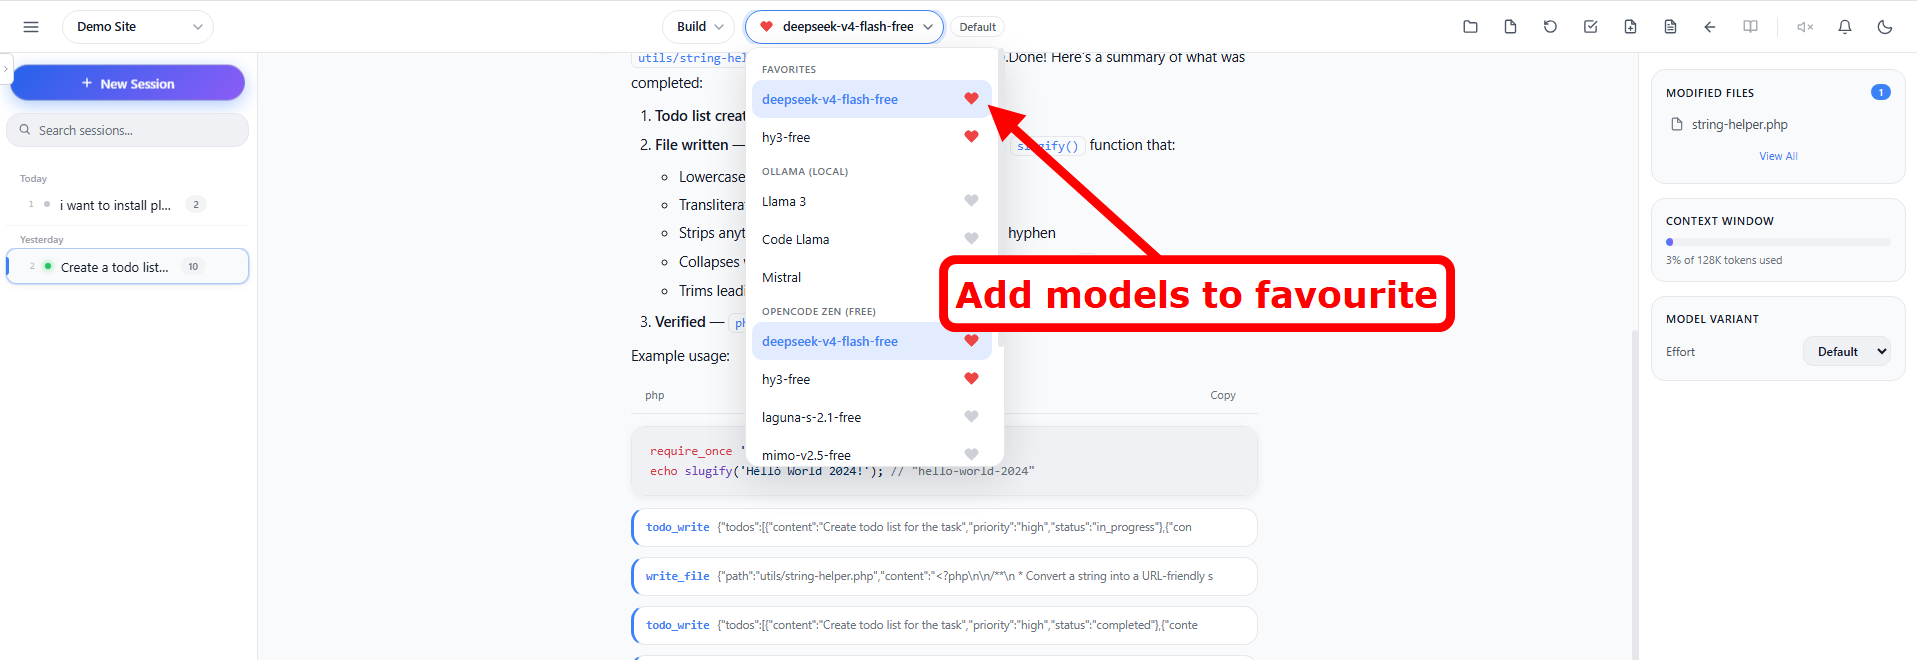
Add your frequently used models to Favorites for quick access :
- Click the heart icon(❤️) next to any model in the dropdown to toggle it as a favorite
- Favorite models (marked with ❤️) appear at the top of the model dropdown
- Click the heart again to remove a model from favorites
- Favorites are saved per-user and persist across sessions
Model Variants (Reasoning Effort)
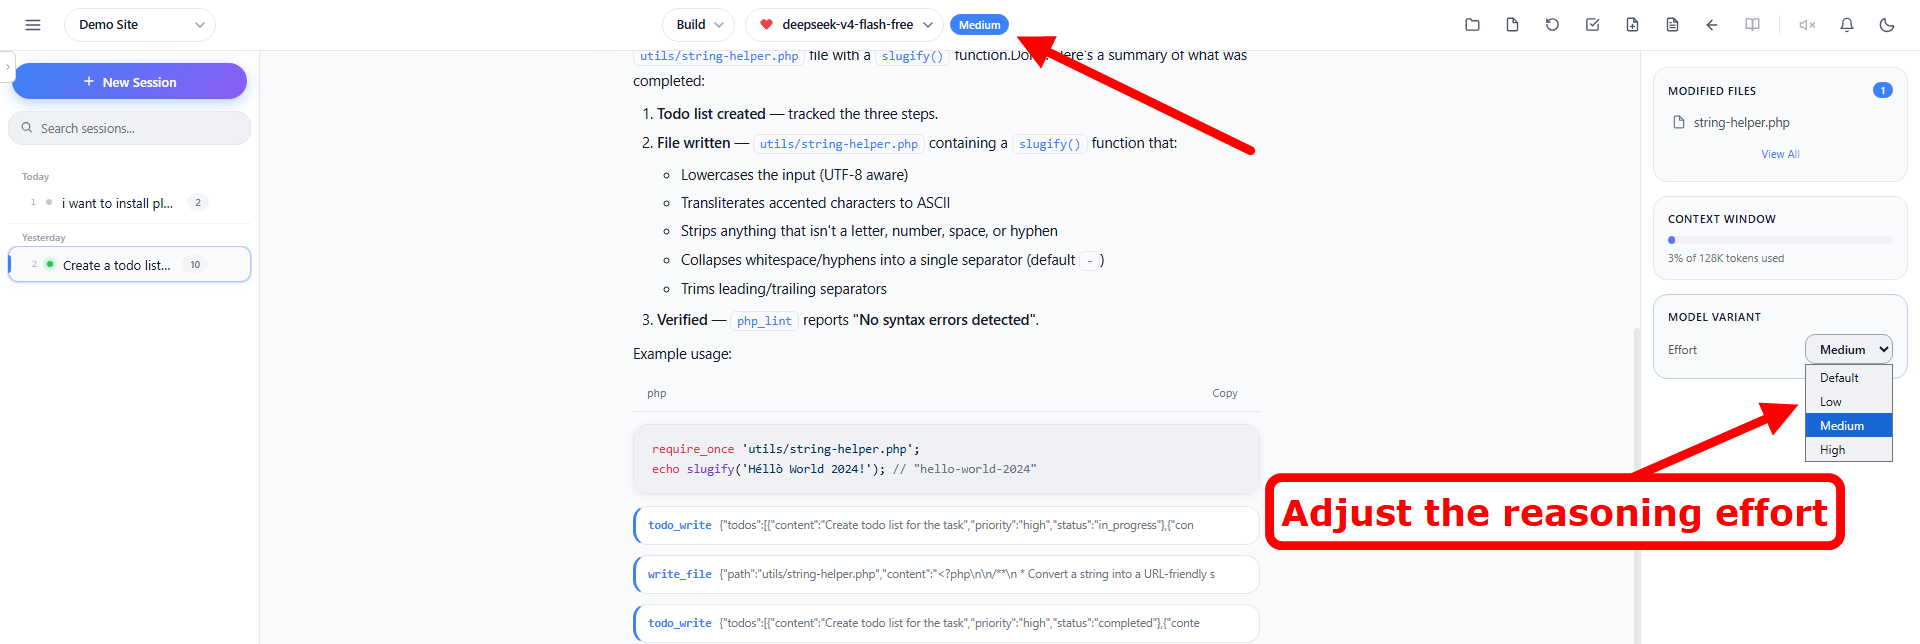
For supported models (Claude, GPT-4o, Gemini, DeepSeek, OpenCode Zen, etc), you can adjust the reasoning effort to control how deeply the model thinks before responding.
Available options: Default, Low, Medium, High
- Default – Standard reasoning (recommended)
- Low – Faster responses, less deep thinking
- Medium – Balanced reasoning
- High – Deepest reasoning, best for complex problems
Changing the Variant
You can change the reasoning effort in two ways:
- Right Side Panel – Use the Effort dropdown in the Model Variant card
- Keyboard – Press Ctrl+Shift+V to cycle quickly
Context Window Tracking
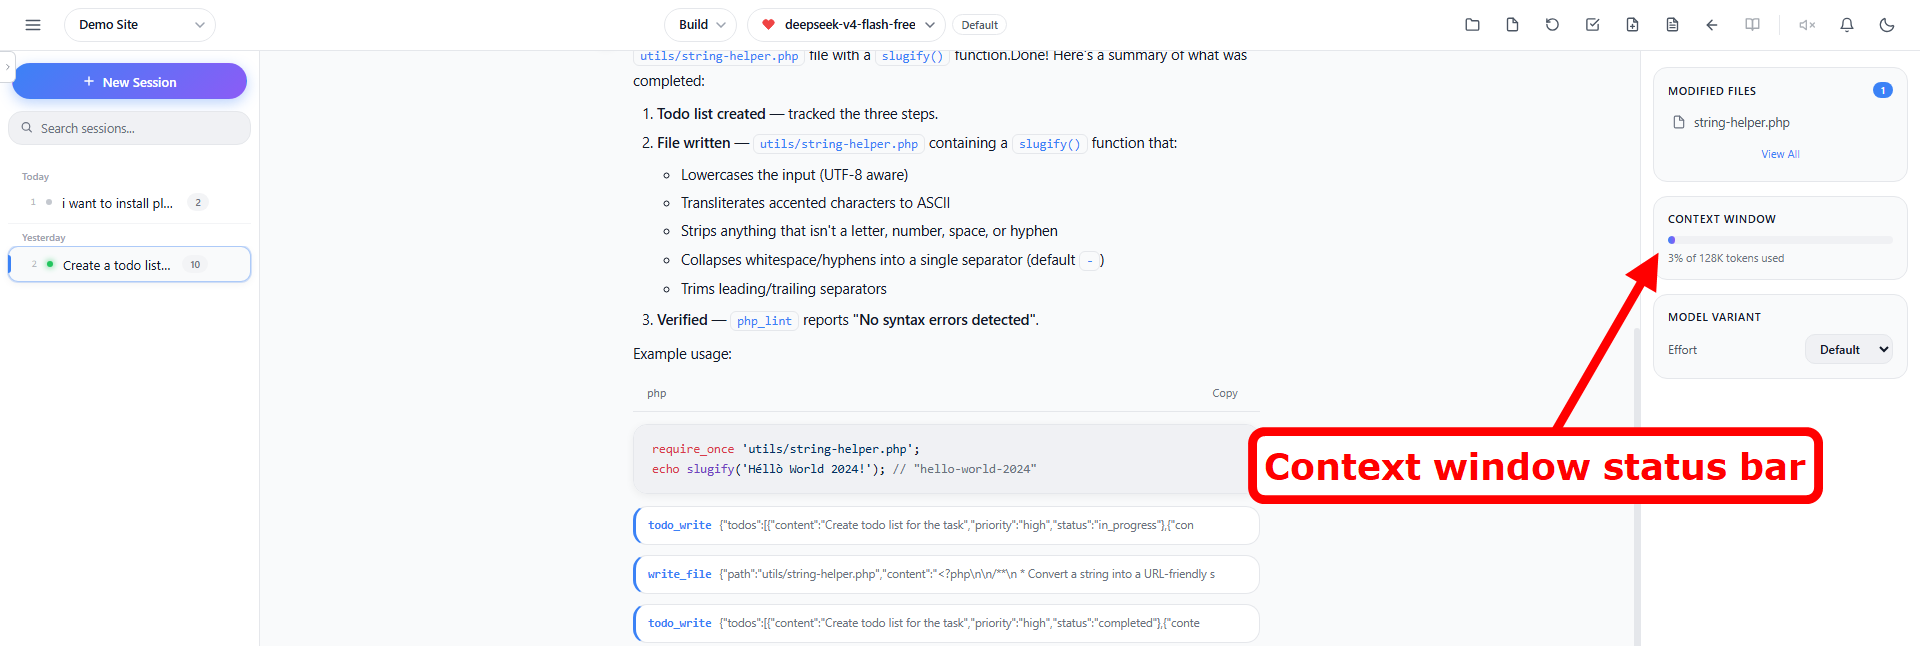
The status bar at the bottom of the screen shows a context window indicator with:
- Token count – Current tokens used
- Visual progress bar – Color-coded (green <75%, amber 75-90%, red >90%)
- Percentage – Context usage as a percentage of the model’s limit
Sidebar Information
The sidebar now surfaces two key metrics without opening any panel:
- Modified Files count – Live badge showing how many files the AI has changed in the current session; click to open the Modified Files panel
- Context Window info – Current token usage and percentage of the model’s context limit, mirrored from the status bar
Creating a Project
The AI Assistant works within projects, which are linked to directories on your server.
Create a New Project
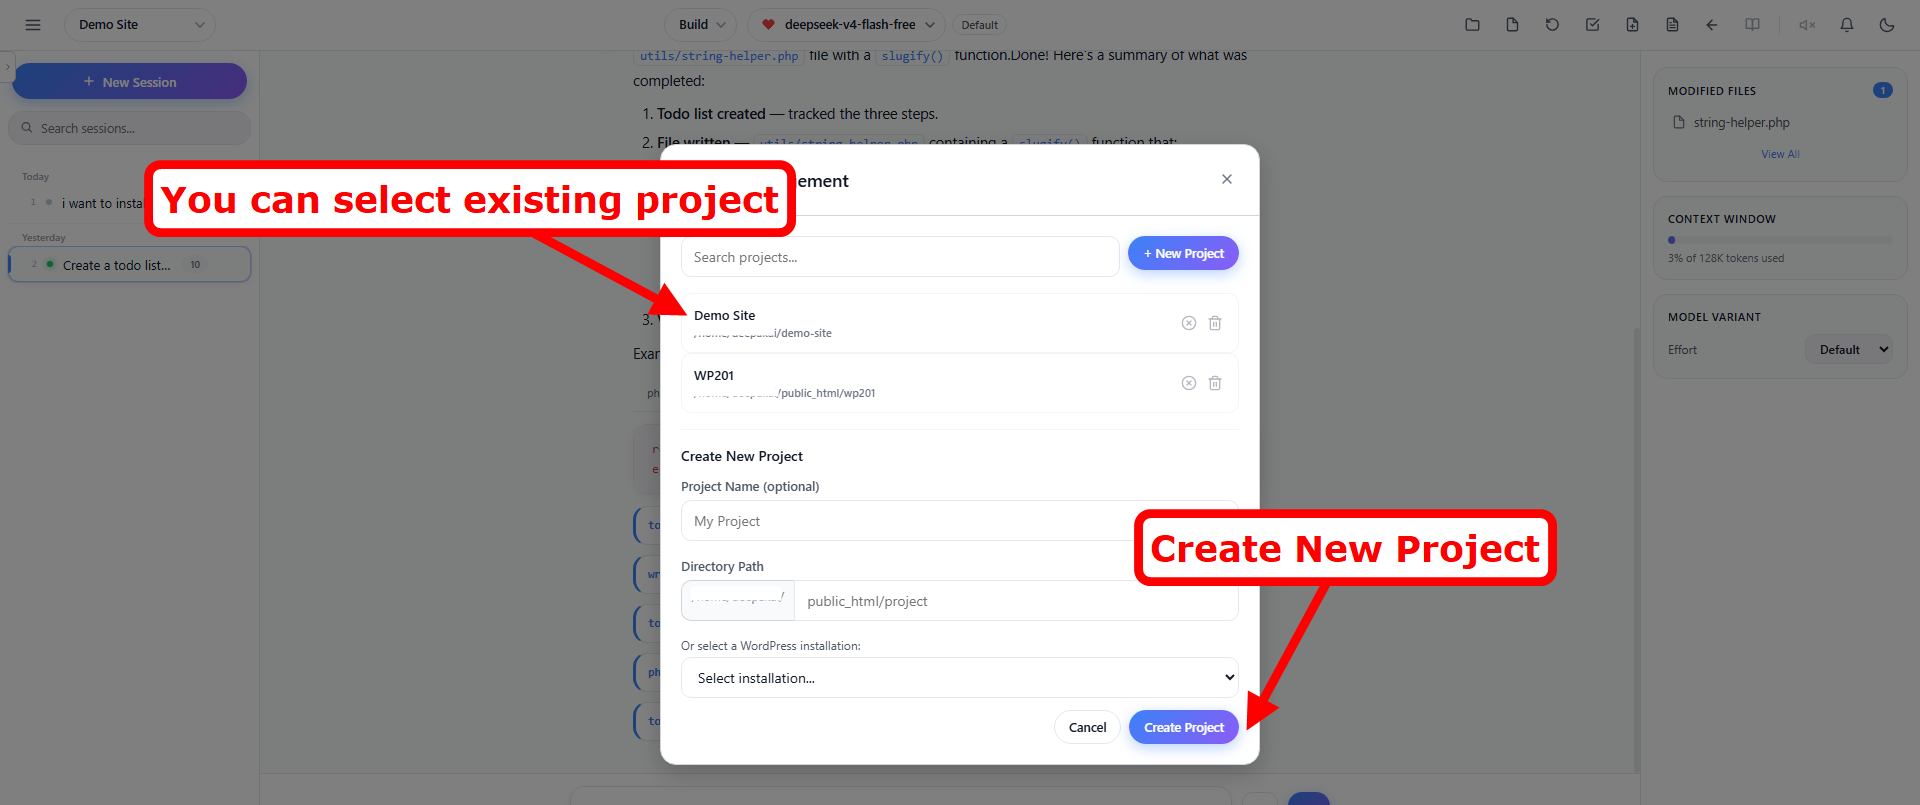
- Click Projects in the AI Assistant header
- Click + New Project
- Choose one of the following options:
- Select an existing WordPress installation from the list
- Or enter a custom directory path manually
- The project will be created and linked to the selected directory
Switch Between Projects
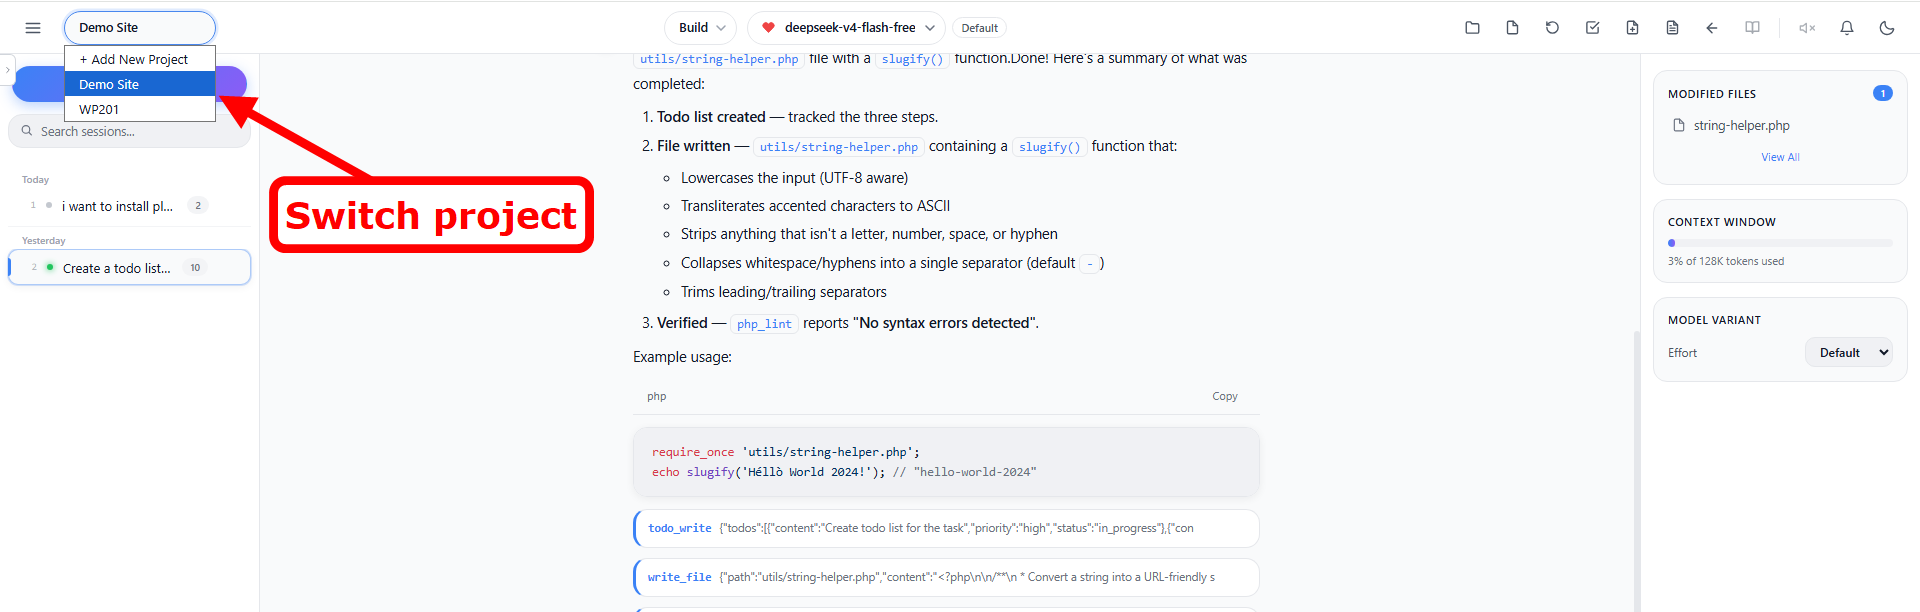
- Use the project dropdown in the header (next to the sidebar toggle button) to switch between projects
- Each project has its own chat sessions, conversation history, and file tree
Close Project
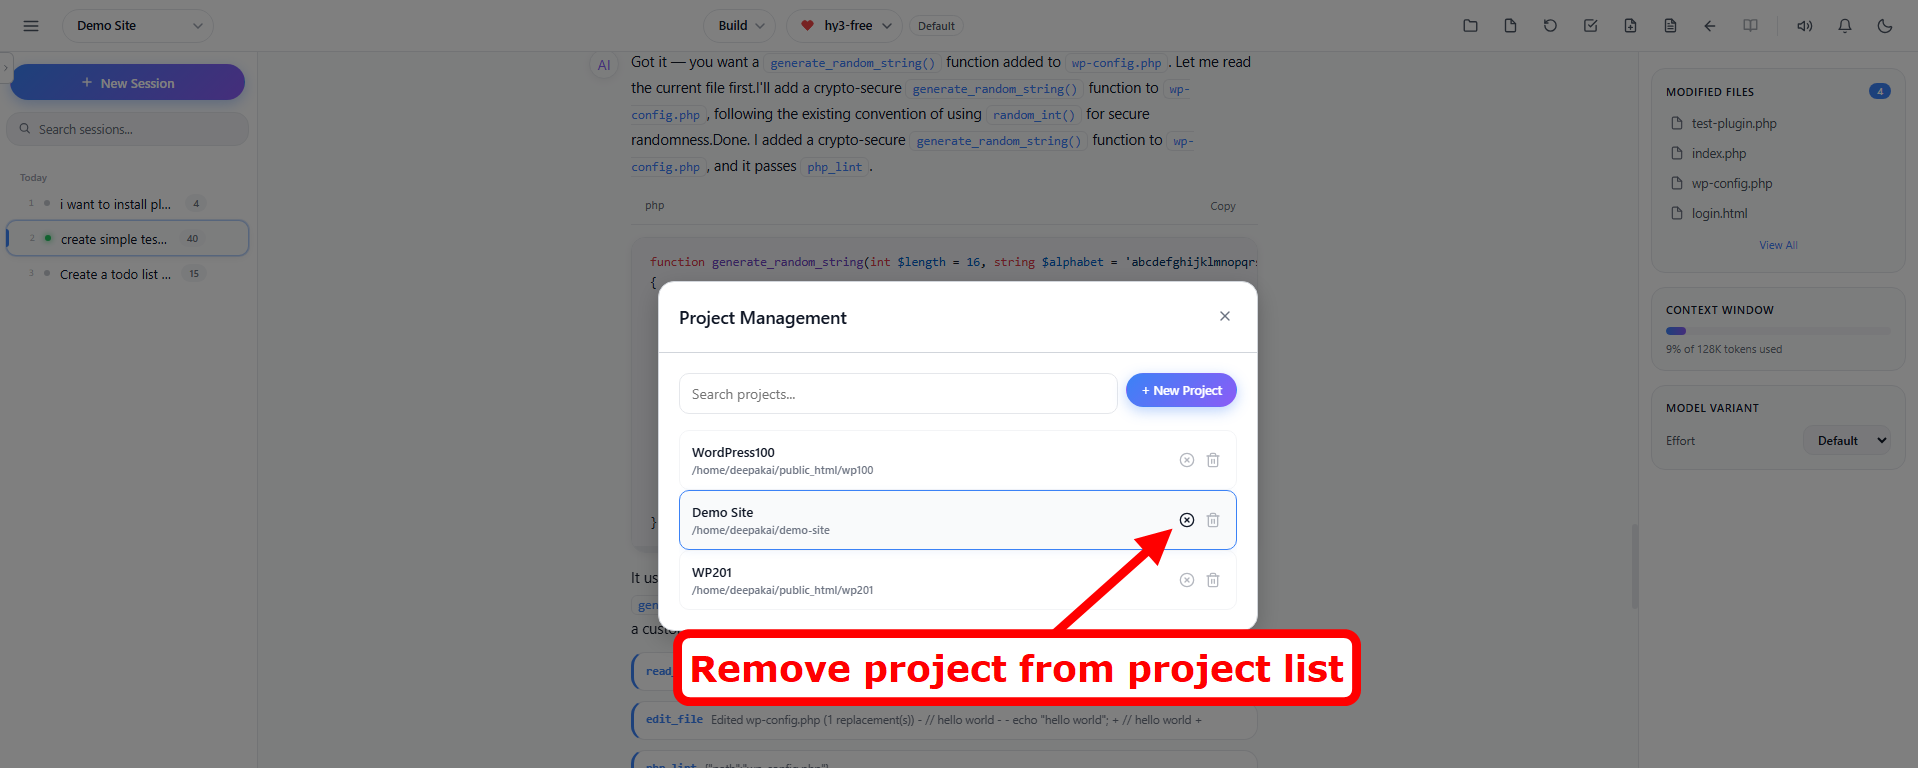
Each project in the project list has a close (✕) button on the right side.
- Click the ✕ button to remove the project from your project list
- A confirmation dialog appears: “Close project [name]? This will remove the project from your project list. No conversations, sessions or context data will be deleted.”
- Non-destructive — only the project entry is removed; all sessions, conversations, and context files (bootstrap, state, memory) remain intact on disk
Note : If you add the same directory as a project again, all the previous data and sessions will reappear in that project.
Delete Project
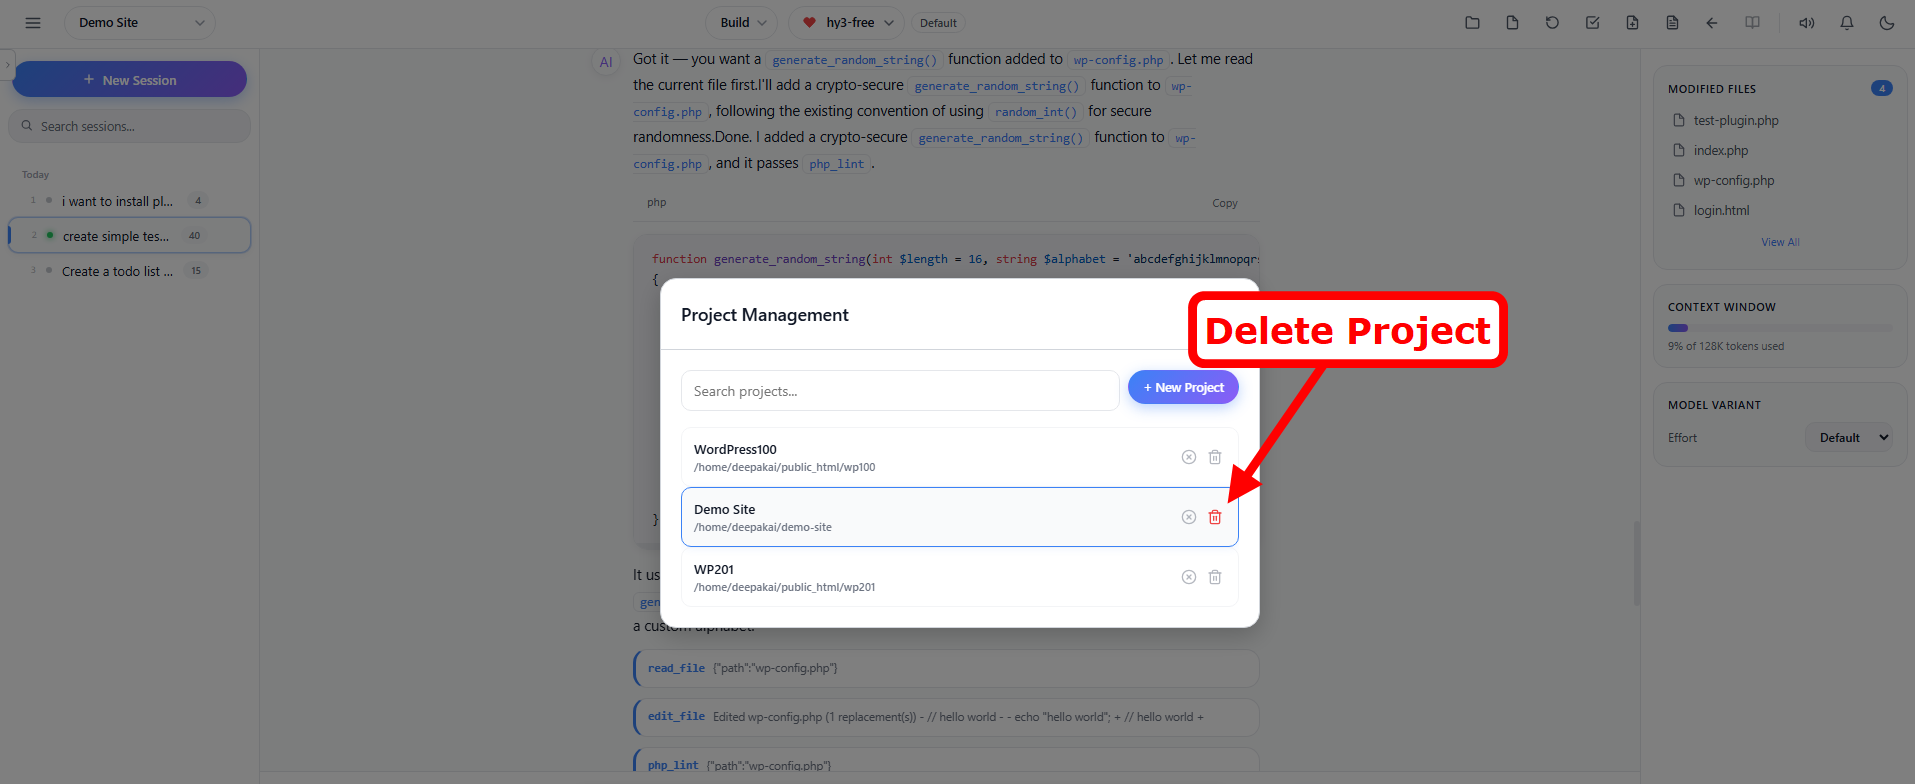
Each project in the project list has a trash icon button next to the close button.
- Click the trash icon to permanently delete a project
- A confirmation dialog appears: “Delete project [name]? This will permanently delete all conversations, sessions and context data for this project.”
- Destructive — this action cannot be undone. It permanently deletes:
- The project and session file
- The entire conversations directory and all conversation files within it
- The context directory (bootstrap, project state, and memory files)
Warning: Delete Project is irreversible. Use Close Project instead if you only want to remove the project from your list without deleting data.
Project Context
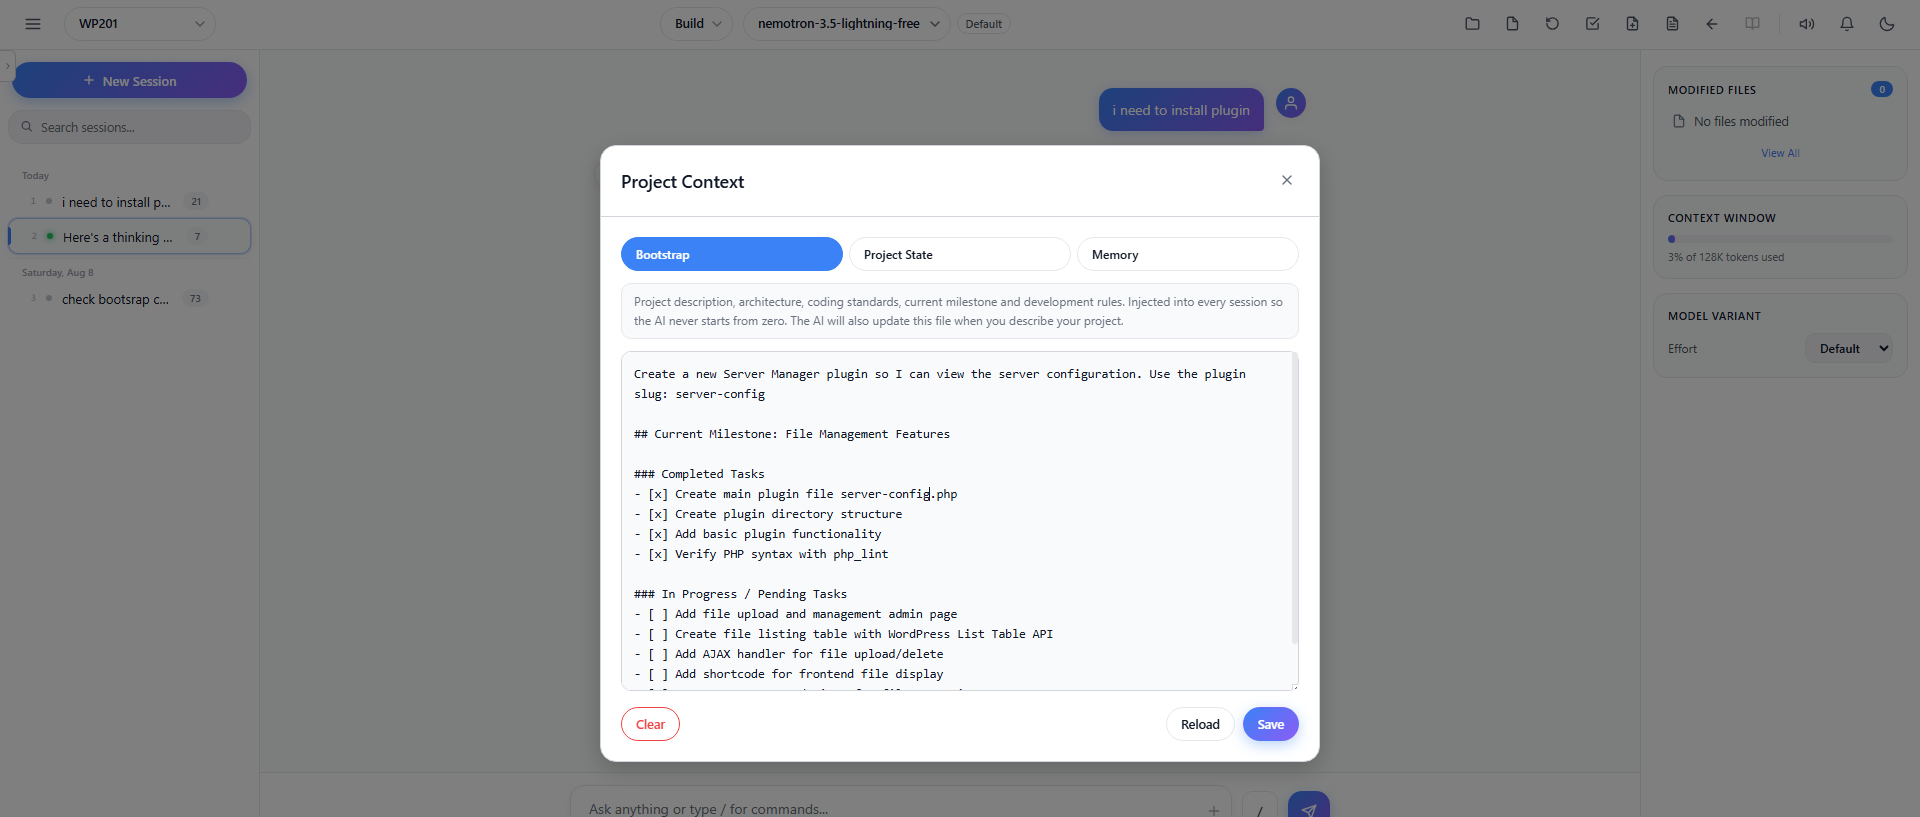
Give your AI persistent, cross-session awareness of your entire project. The Project Context feature maintains three intelligent context files outside your project directory, Bootstrap, State, and Memory that automatically stay in sync and are injected into every new conversation.
Your AI remembers what you built, what changed, what matters, and where you left off.
No more repeating context. No more starting from scratch. Just continue where you left off every session.
- Bootstrap – Authoritative project description, architecture, coding standards, current milestone. The AI treats this as the source of truth for how the project should be built.
- Project State – Current project state, last completed task, current milestone, pending/blocked tasks. Auto-updated during and after each session so the AI knows exactly where work left off.
- Memory – Durable facts, decisions, conventions, and lessons learned across sessions. Automatically extracted from conversations so the AI never repeats the same mistakes.
Steps to Create a New Project Using Project Context
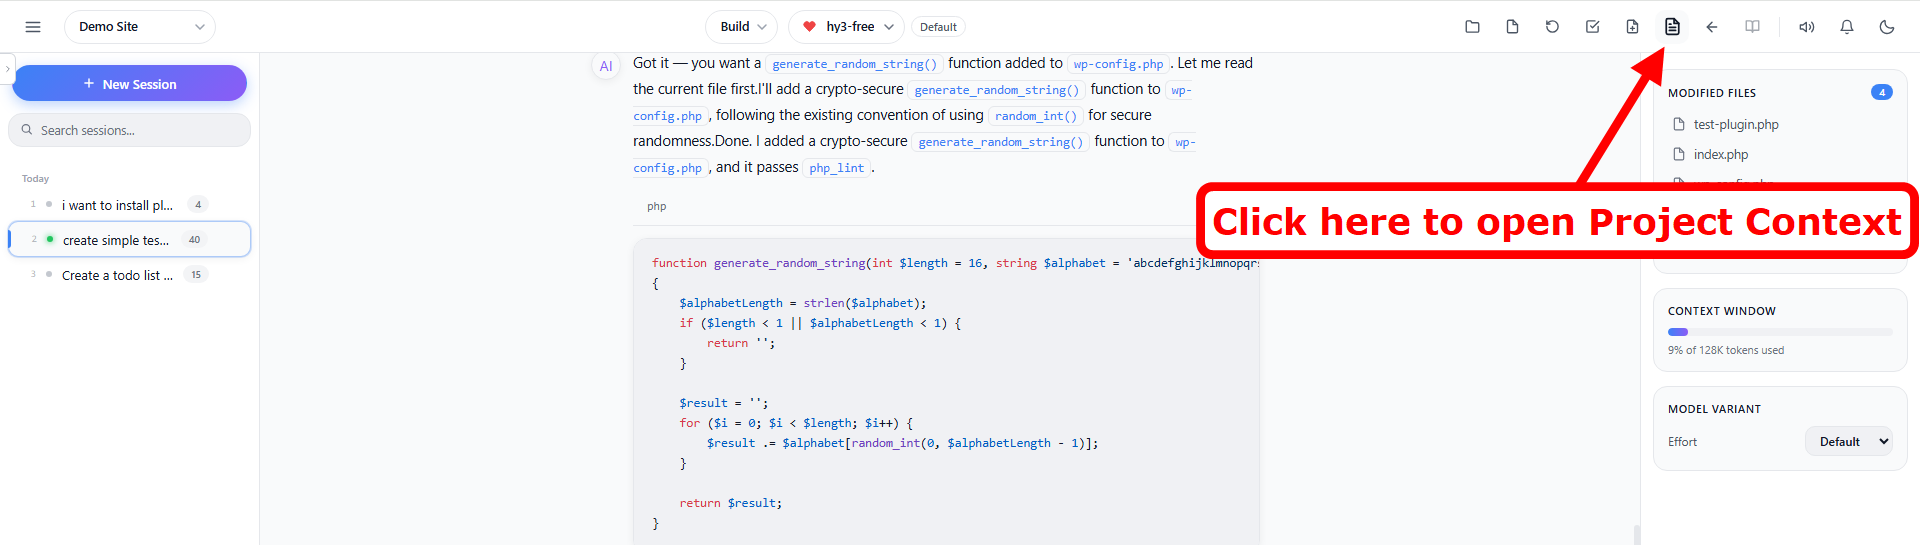
Open Project Context from the header (document icon) to view and edit the three context files in tabs:
- Describe your project manually – fill in the Bootstrap tab with your project description, architecture, and coding standards
- Or simply ask the AI – e.g., “Update my bootstrap with the plugin details” – and it will write/update Bootstrap, create a task list, and implement tasks step by step
- Project State updates automatically during and after each session, and Memory grows as decisions and lessons are extracted from your conversations
Using the AI Assistant
Starting a Chat Session
- Select your project from the dropdown
- Choose an AI model from the header dropdown
- Type your request in the chat input at the bottom
- Press Enter to send (or Shift+Enter for a new line)
- The AI will respond and can perform actions like editing files or running commands
Creating New Sessions
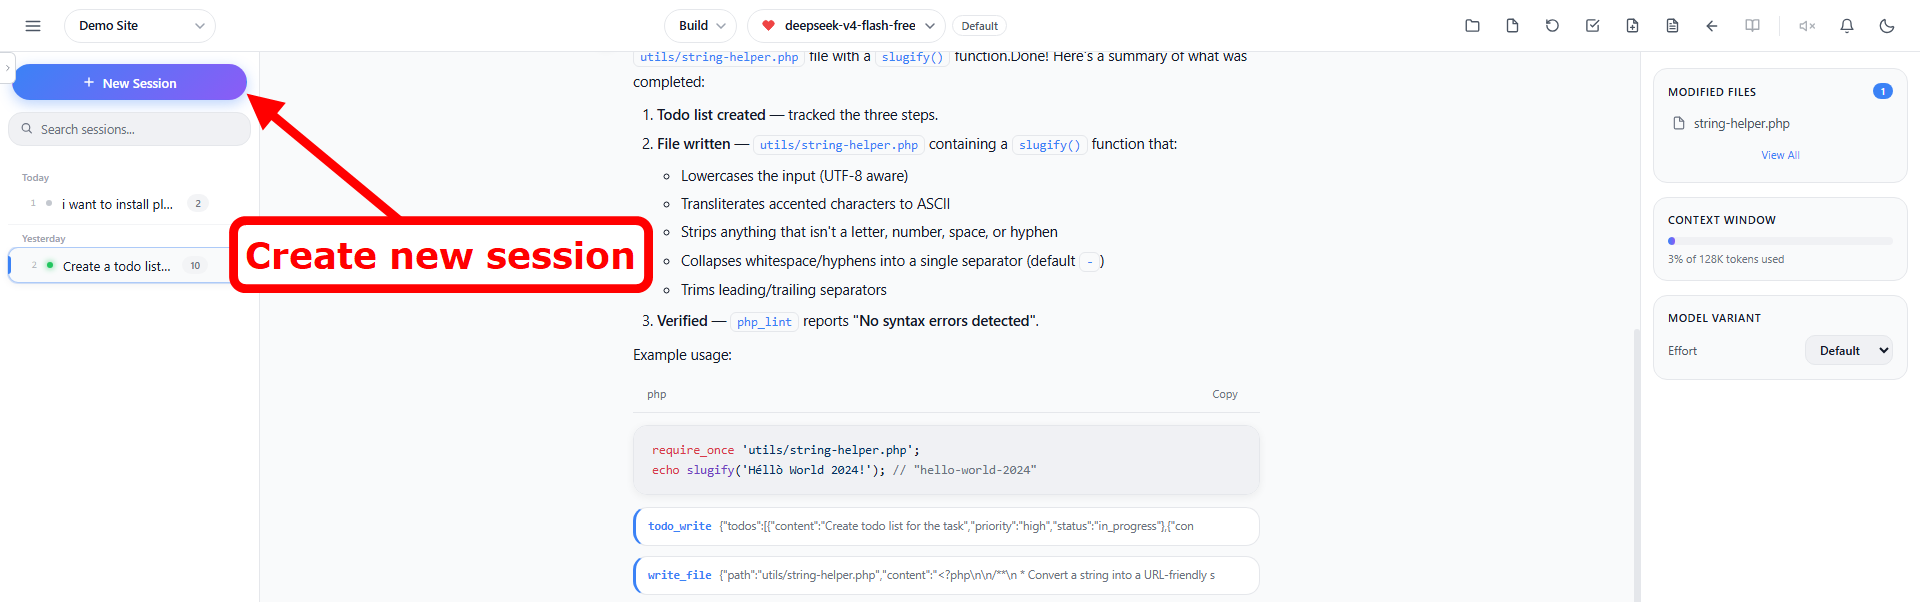
- Click + New Session to start a fresh conversation
- Previous sessions are listed in the sidebar
- Click on any previous session to resume it
- Sessions are automatically grouped by date (Today, Yesterday, older dates)
- Press Alt+1 through Alt+99 to quickly switch between up to 99 sessions.
- Type the number after holding Alt (e.g., hold
Alt, press2then4, releaseAlt→ switches to session 24).
Session Management
Session Timeline
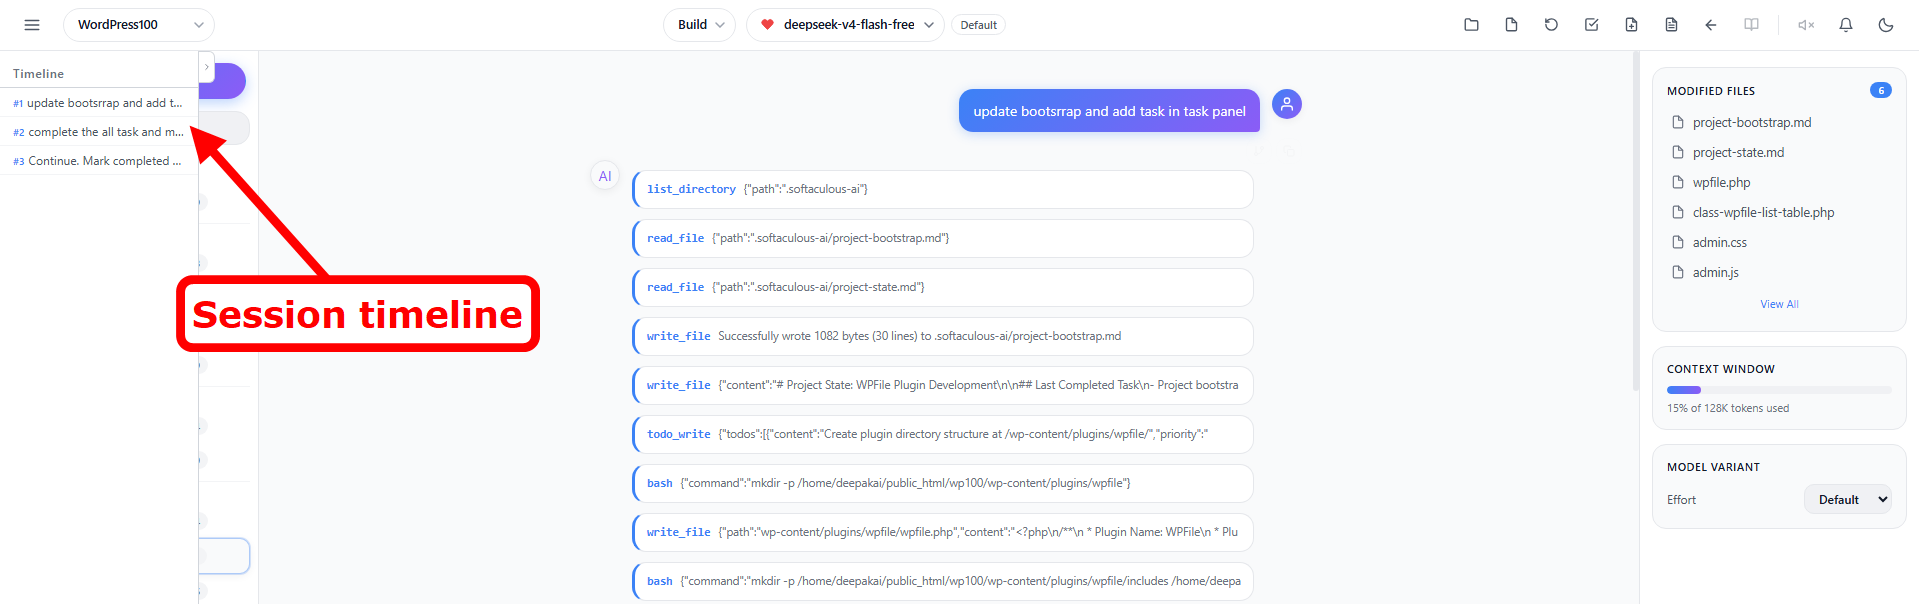
The Timeline panel shows all user messages in the current conversation, allowing you to quickly jump to any point in the conversation.
- Click the chevron icon ( >) on the left edge of the screen to open the timeline
- Or use the slash command
/timeline - Click any message in the timeline to scroll directly to it
Session Search
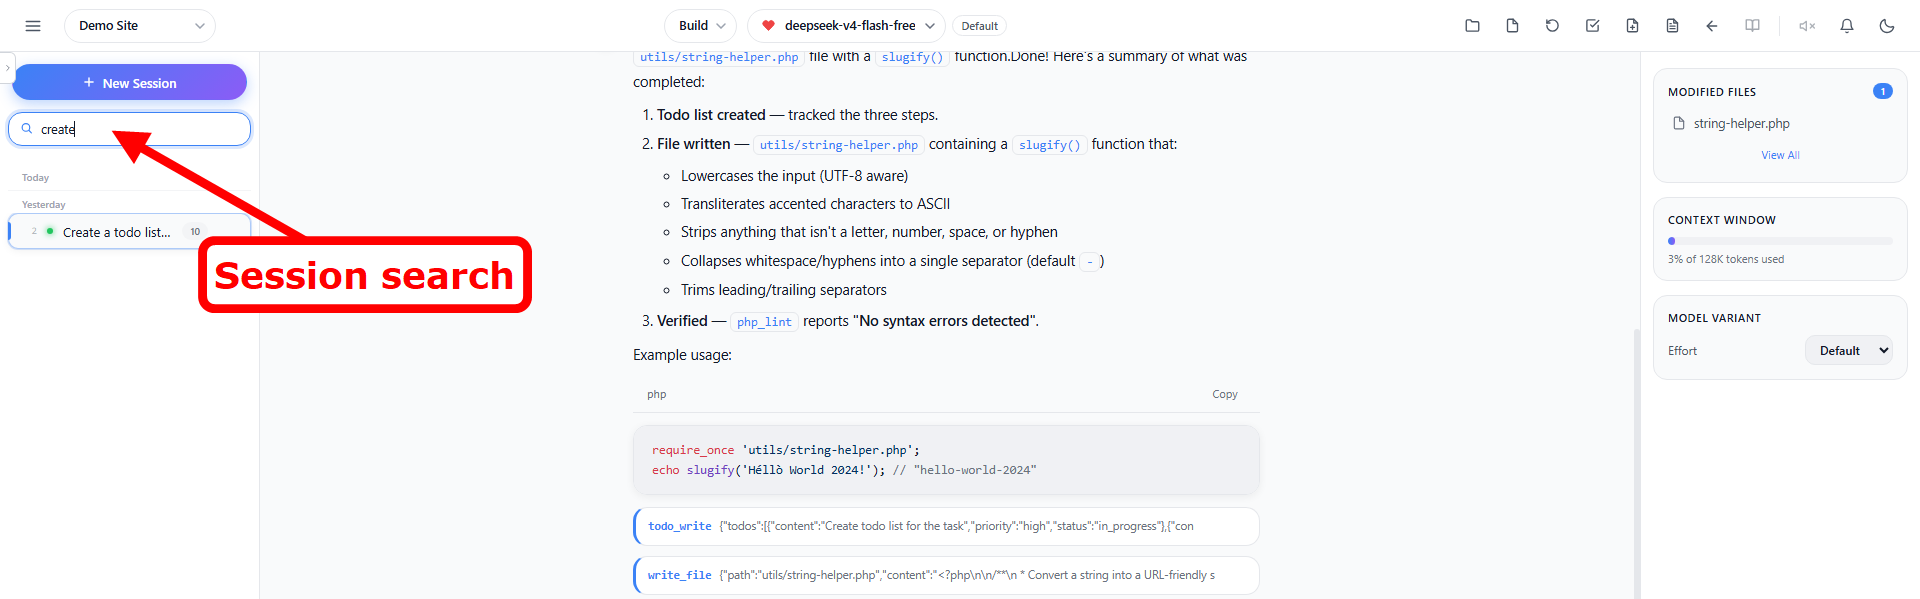
Use the search box at the top of the sidebar to filter sessions by title or content:
- Click the search icon at the top of the sidebar
- Type your search query
- Sessions matching your query will be highlighted
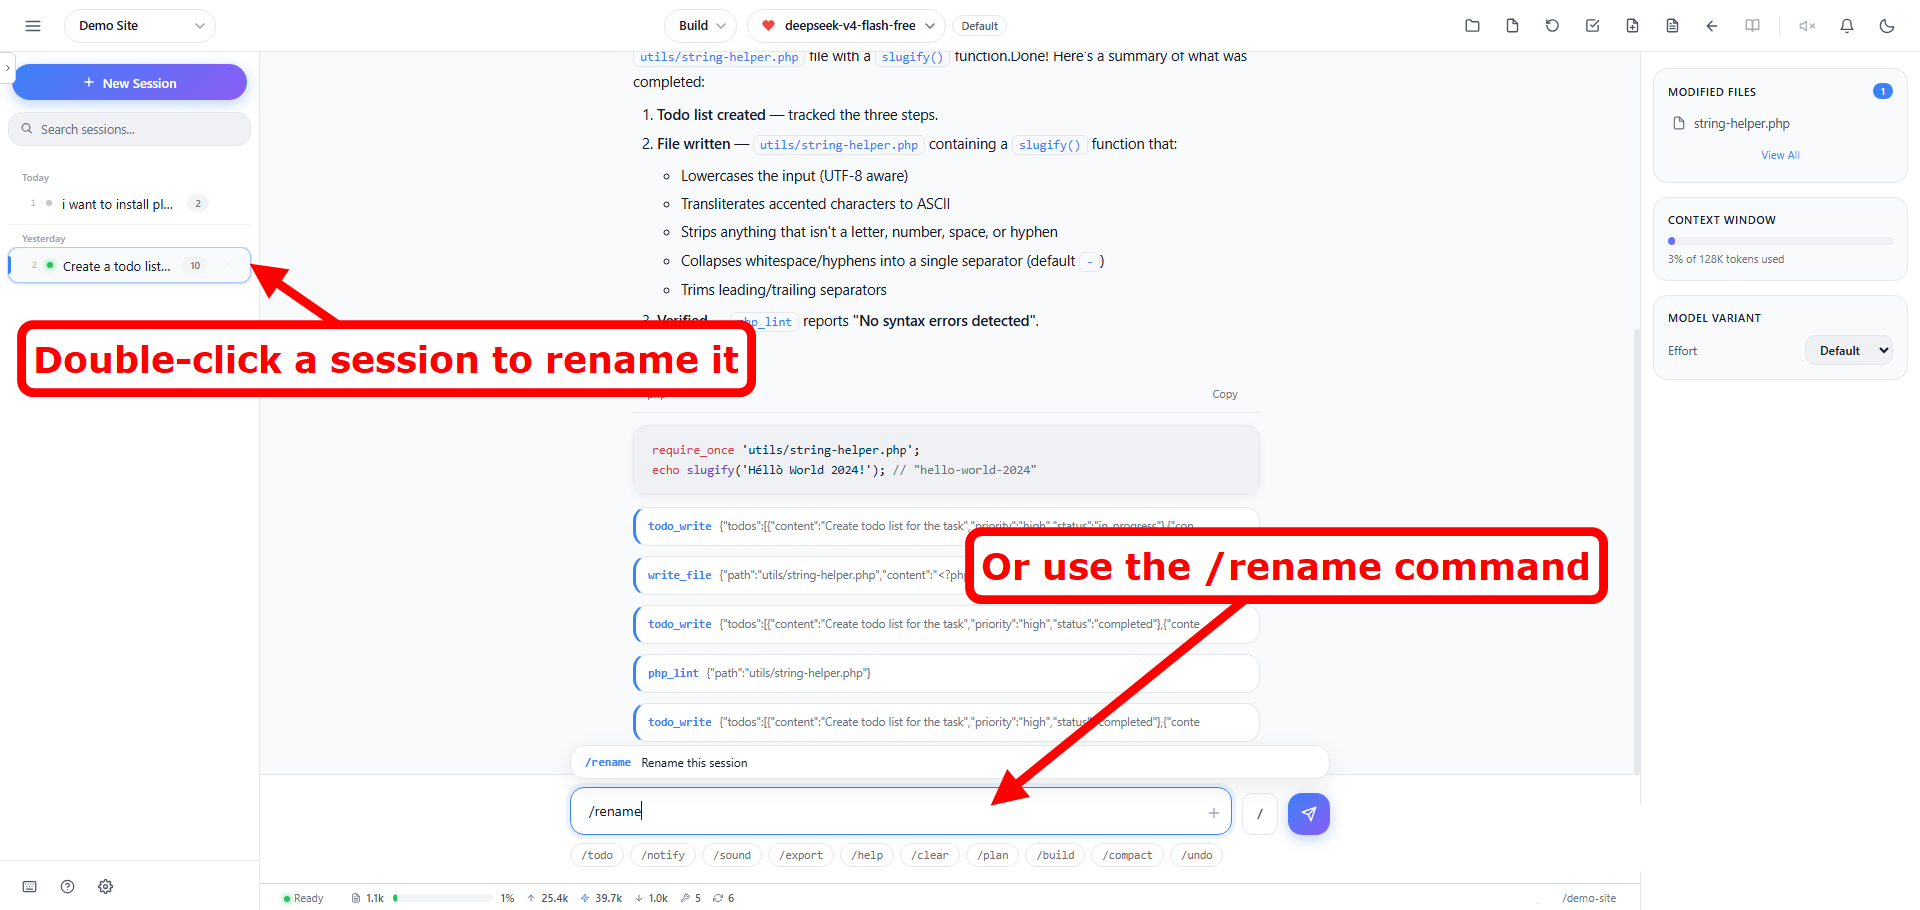
Session Rename
- Double-click on any session title in the sidebar to rename it
- Type the new name and press Enter to confirm
- Or use the slash command
/renameto rename the current session
Auto-Generated Session Titles
When you start a new conversation, the AI automatically generates a short, descriptive title based on the content of your first message and the AI’s response. This makes it easy to identify sessions at a glance.
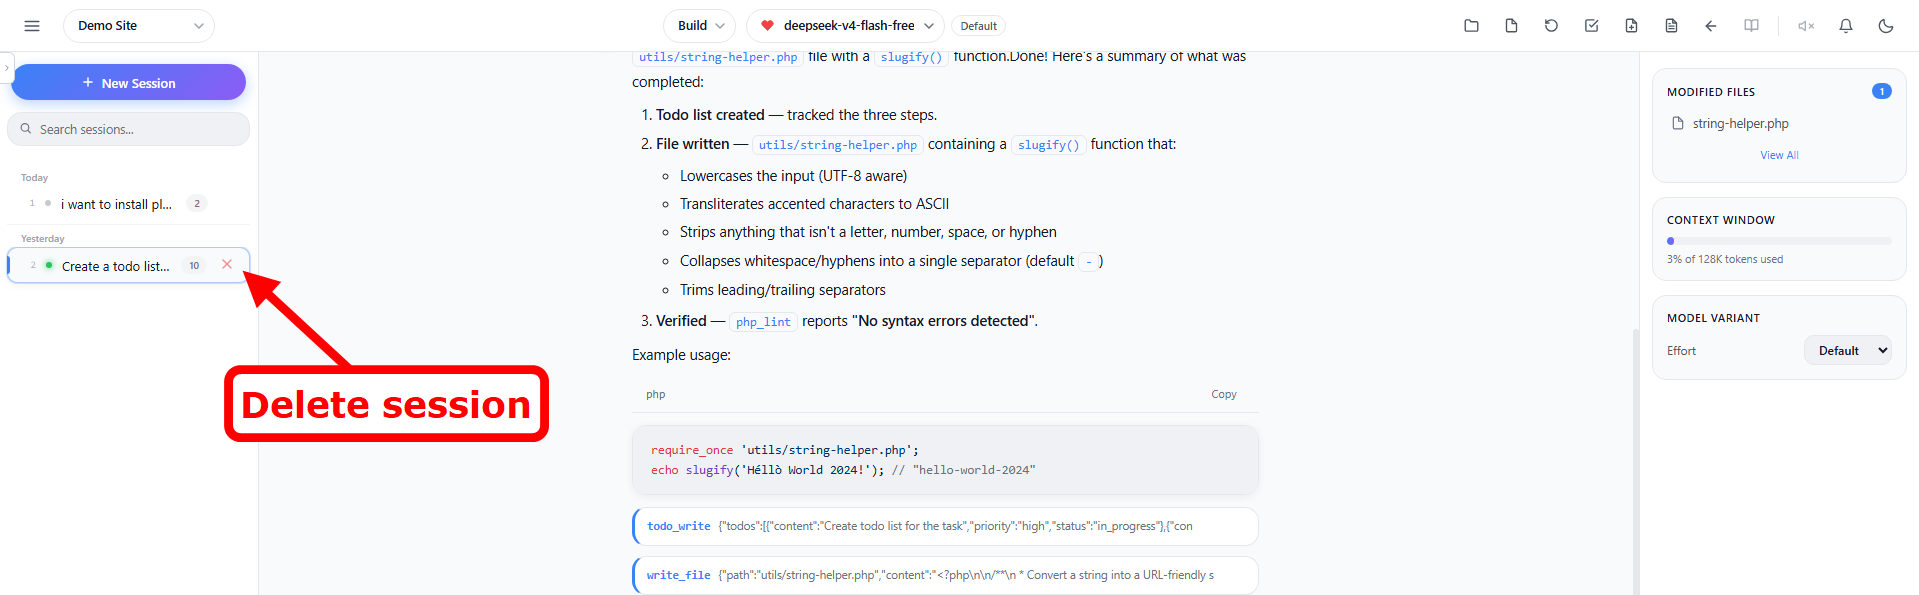
Delete Sessions
- Click the × button next to any session in the sidebar to delete it
- Deleted sessions cannot be recovered
Independent Sessions
Sessions now work independently. While the AI is processing a long task in one session, you can freely switch to another session and continue sending prompts – nothing blocks.
- Start a large refactor in Session A, then answer a quick question in Session B while A runs
- Each session shows its own live status (see Session Status Indicators below)
- Streaming continues in the background even when you are viewing another session
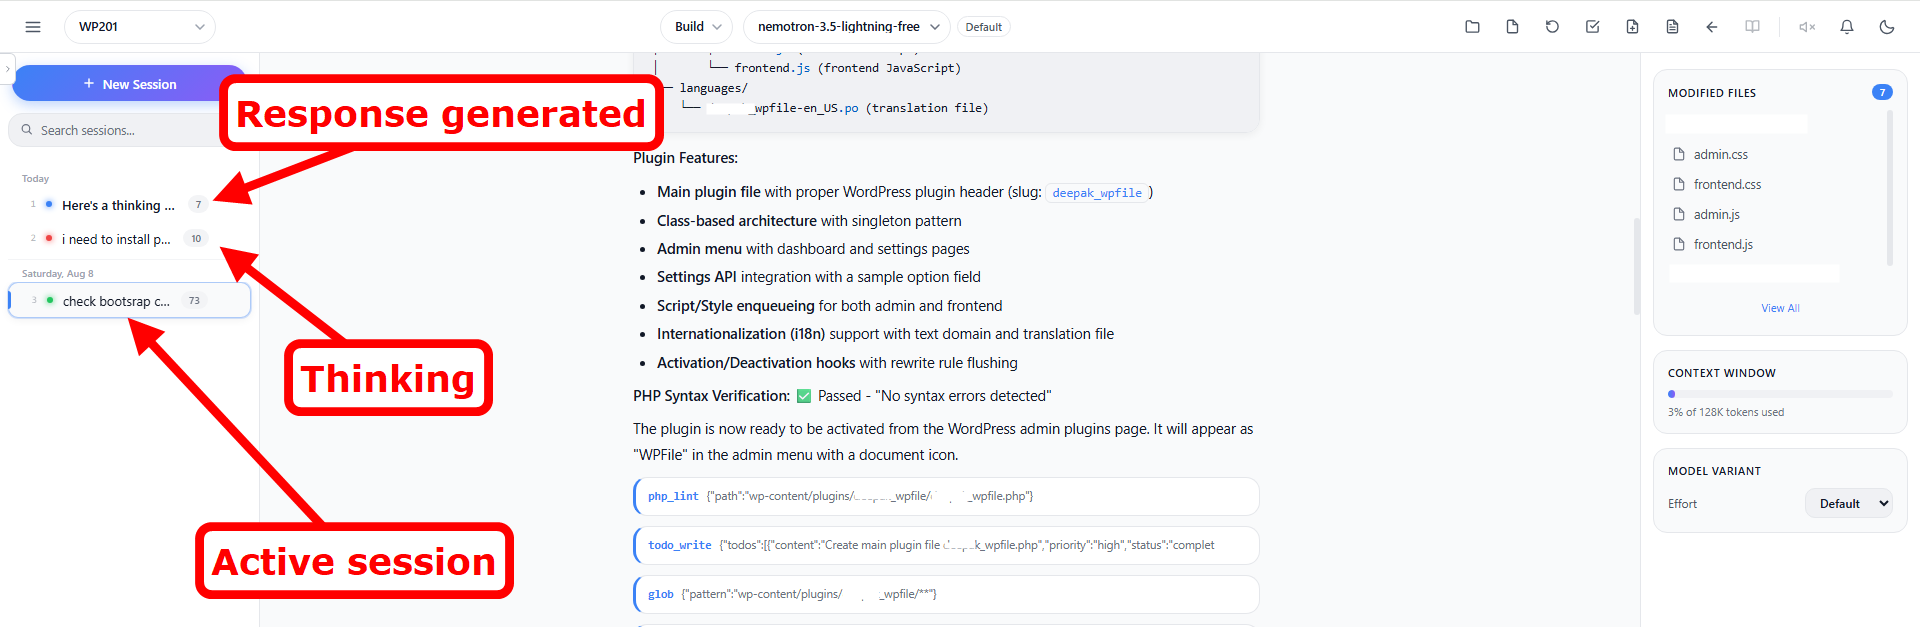
Session Status Indicators
Each session in the sidebar now shows a colored status dot:
🔴 Red – The AI is currently processing/thinking in that session.
🔵 Blue – The AI finished responding and you haven’t read the response yet (title also appears bold).
🟢 Green – Active session whose response has been viewed.
Click a session with a blue dot to jump straight to its unread response, the dot clears once viewed.
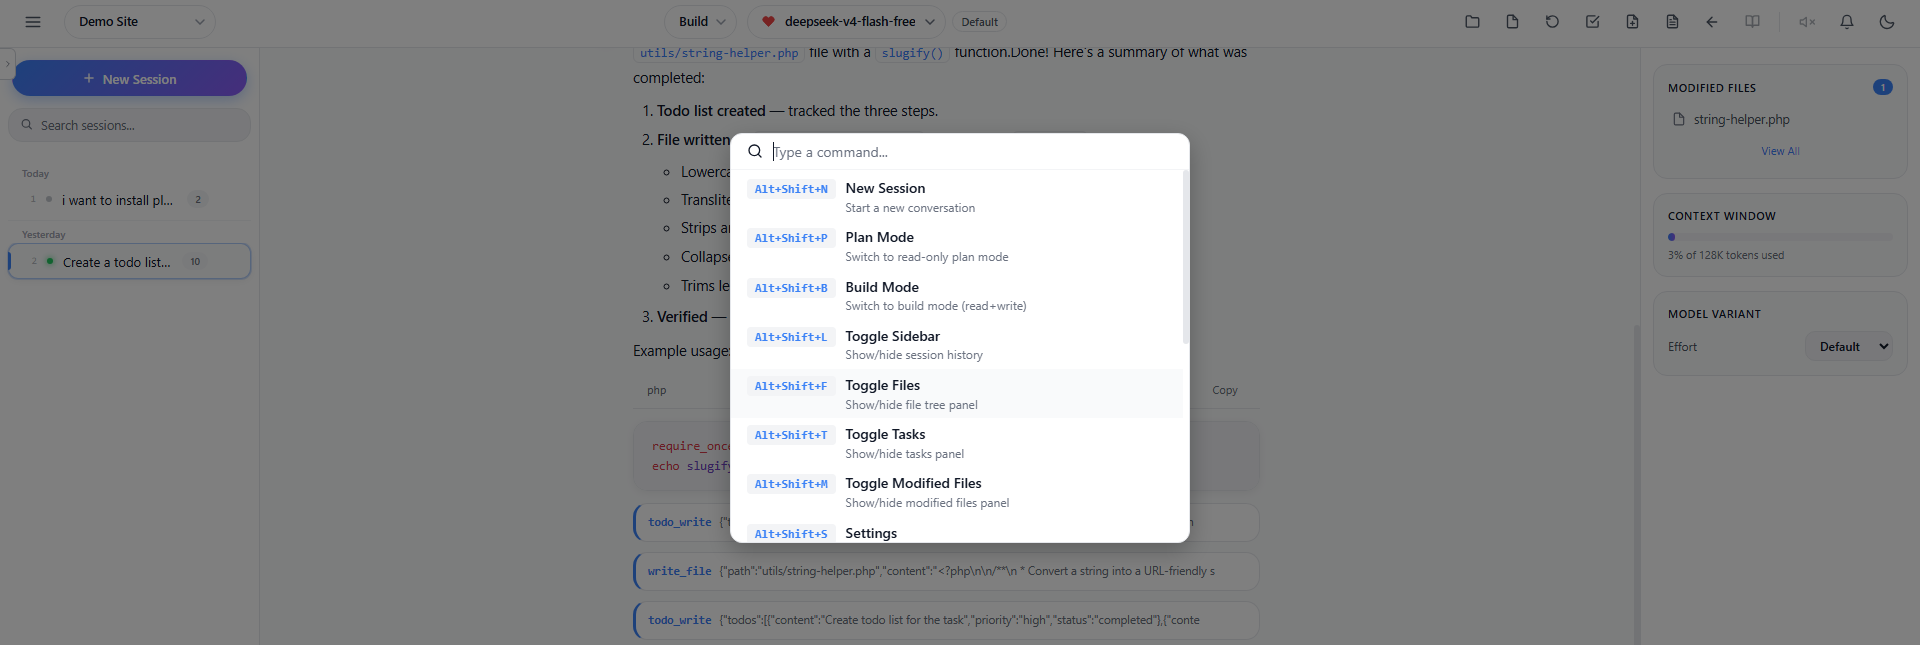
Command Palette
Press Ctrl+K to open the Command Palette – a quick-access search interface for all available commands.
- Type to search for commands like “New Session”, “Plan Mode”, “Compact”, “Undo”, “Fork”, “Settings”, etc.
- Use arrow keys to navigate the results
- Press Enter to execute the selected command
- Press Escape to close the palette
Slash Commands
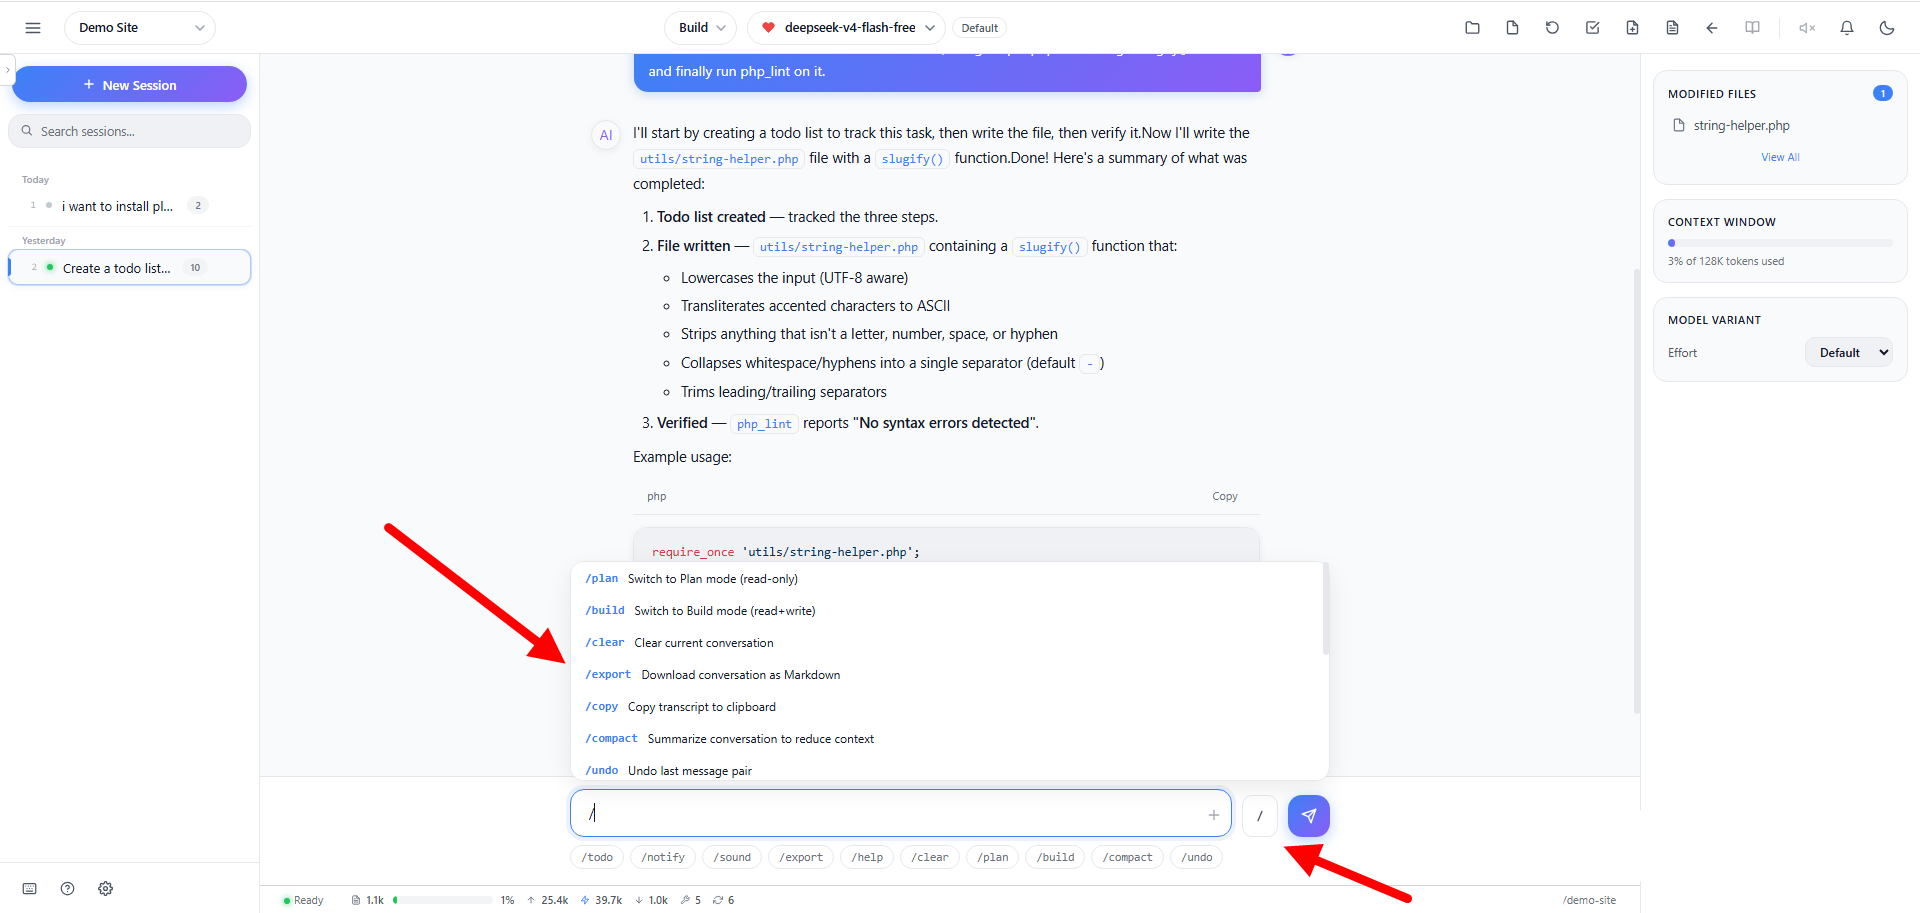
Type / in the chat input to see available commands. A dropdown will appear showing matching commands as you type.
| Command | Description |
|---|---|
/build | Switch to Build mode (full access) |
/plan | Switch to Plan mode (read-only) |
/clear | Clear current conversation |
/export | Download conversation as Markdown |
/copy | Copy transcript to clipboard |
/compact | Summarize conversation to reduce context |
/undo | Undo last message pair |
/redo | Redo last undone message |
/fork | Fork conversation from last message |
/rename | Rename this session |
/todo | Add a task item (e.g. /todo Fix login bug) |
/sound | Toggle sound notifications on/off |
/notify | Toggle browser notifications |
/keybindings | Customize keyboard shortcuts |
/timeline | Toggle message timeline navigation |
/help | Show keyboard shortcuts and commands |
Quick Command Chips
Below the chat input you will find quick-access chips for the most common commands:
/todo , /notify , /sound , /export , /help , /clear , /plan , /build , /compact , /undo
Clicking a chip inserts the command into the input instantly – no typing required.
Slash Button
- Slash ( / ) button – Located next to the send button. Click it to open the full slash command menu.
Inline Commands (@build / @plan)
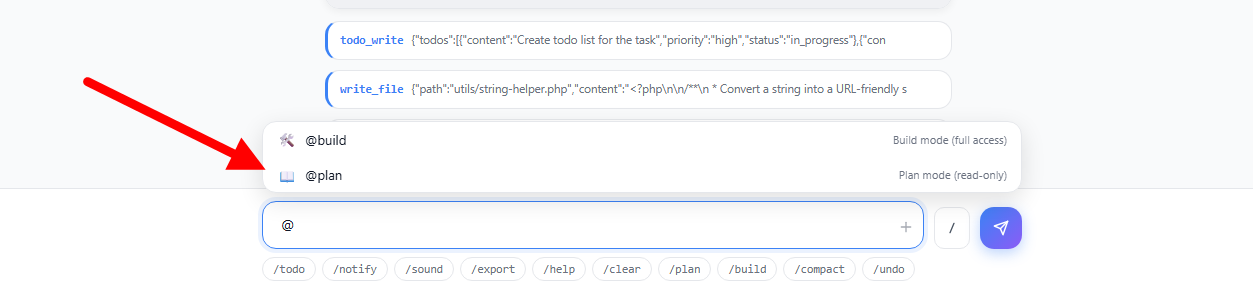
You can switch modes inline while typing a message:
- Type
@buildin your message to switch to Build mode - Type
@planin your message to switch to Plan mode - A dropdown will appear showing matching mode options
- Select an option to switch modes and continue your message
Shell Mode
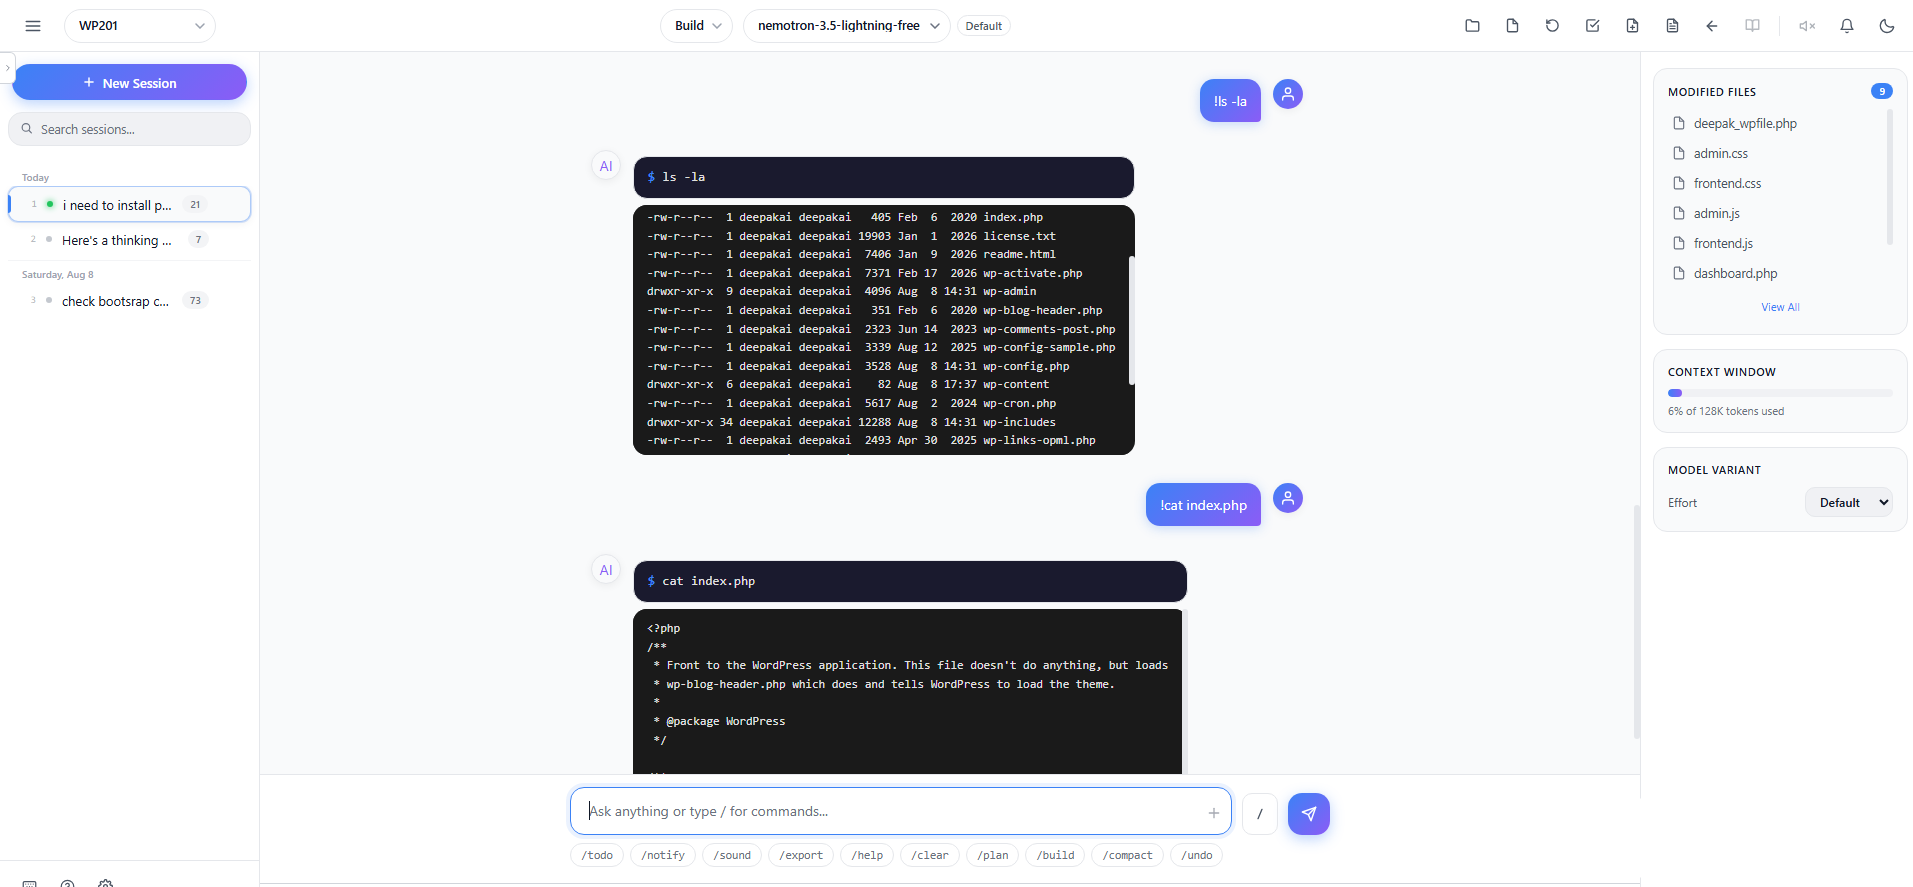
Run shell commands directly from the chat input without the AI:
- Type
!followed by a command (e.g.,!ls -la,!cat index.php) - The command executes immediately with terminal-style output
- Output is displayed in a styled terminal block with
$prefix - Whitelisted commands include:
ls,cat,php,node,npm,composer, and more
Build Mode vs. Plan Mode
The AI Assistant has two operating modes:
Build Mode
- The AI has full access to read, write, edit files, and run commands
- Use this when you want the AI to make changes to your project
- Default mode for active development
Plan Mode
- The AI operates in read-only mode
- It can explore and analyze your code but cannot modify anything
- Use this for:
- Code reviews
- Explanations
- Planning changes before implementing them
Switching Modes
- Use the mode dropdown in the header
- Or use slash commands:
/buildor/plan - Or use inline commands:
@buildor@plan - Or use keyboard shortcuts:
Alt+Shift+B(Build) orAlt+Shift+P(Plan)
What the AI Can Do
File Operations
- Read files – View file contents
- Write files – Create new files
- Edit files – Make targeted changes to existing files
- Search files – Find files by name or content (glob/grep)
System Operations
- Run shell commands – Execute commands in your project directory
- Create directory listings – View project structure
Code Assistance
- Write new code
- Troubleshoot website issues
- Debug existing code
- Refactor and optimize code
- Explain code functionality
- Generate code snippets
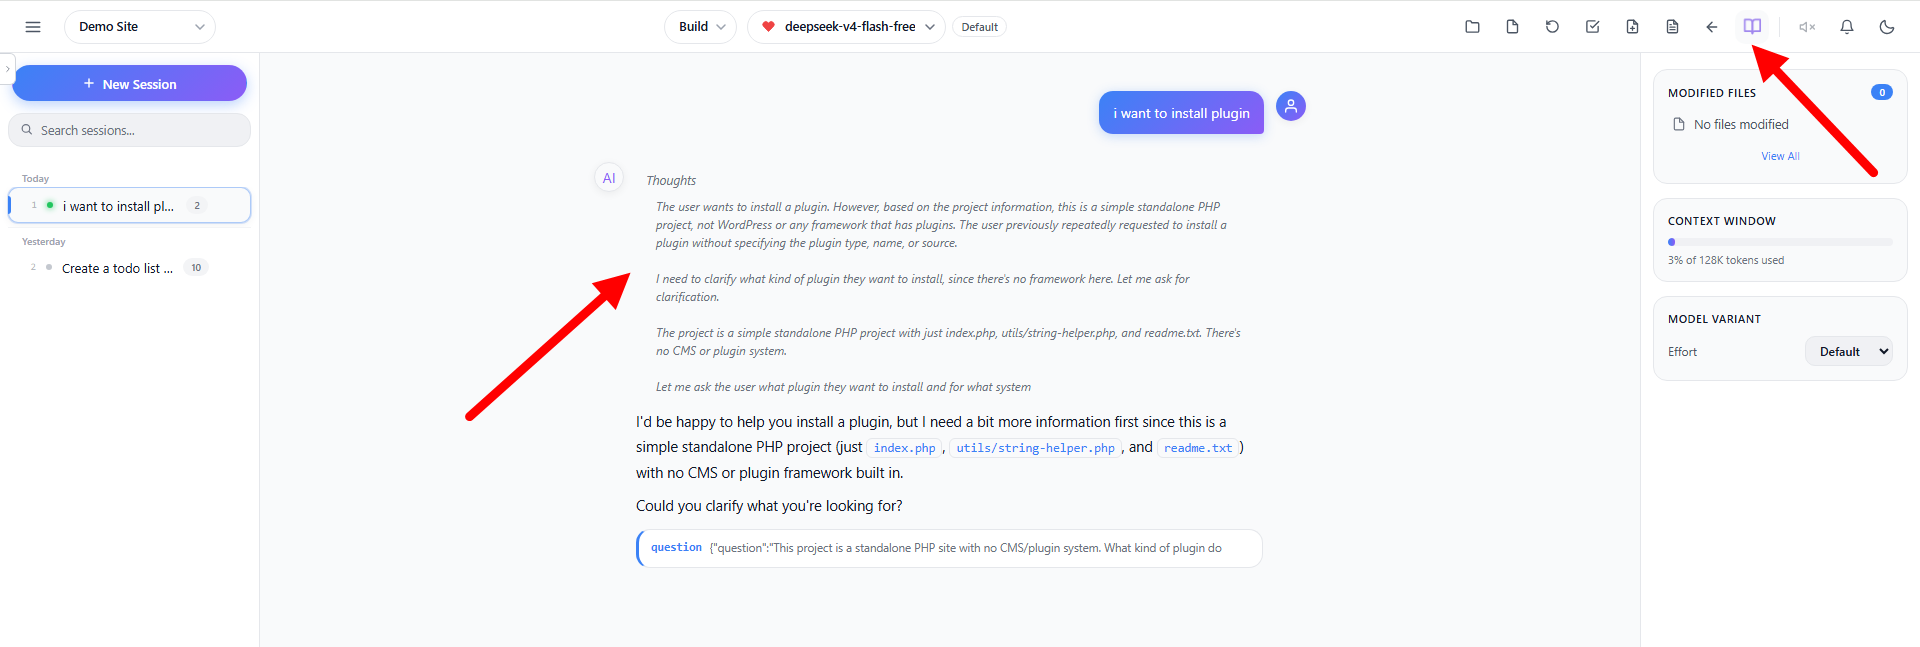
Reasoning / Thinking Display
When using any AI model, the AI’s thinking process is displayed in a special reasoning block.
- Show – All reasoning blocks are expanded and visible
- Collapse – Reasoning blocks are collapsed (click to expand individually)
- Hide – All reasoning blocks are hidden
Click the Reasoning button in the header to cycle through these states. The button only appears when reasoning blocks are present in the conversation.
Syntax Highlighting
Code generated by the AI is rendered with full syntax highlighting:
- Language-aware coloring for PHP, JavaScript, Python, CSS, HTML, SQL, and more
- Improved color palette for better readability in both dark and light themes
- The highlight theme automatically follows your Dark/Light mode selection
No configuration needed, every code block in the conversation is highlighted automatically.
Modified Files Panel
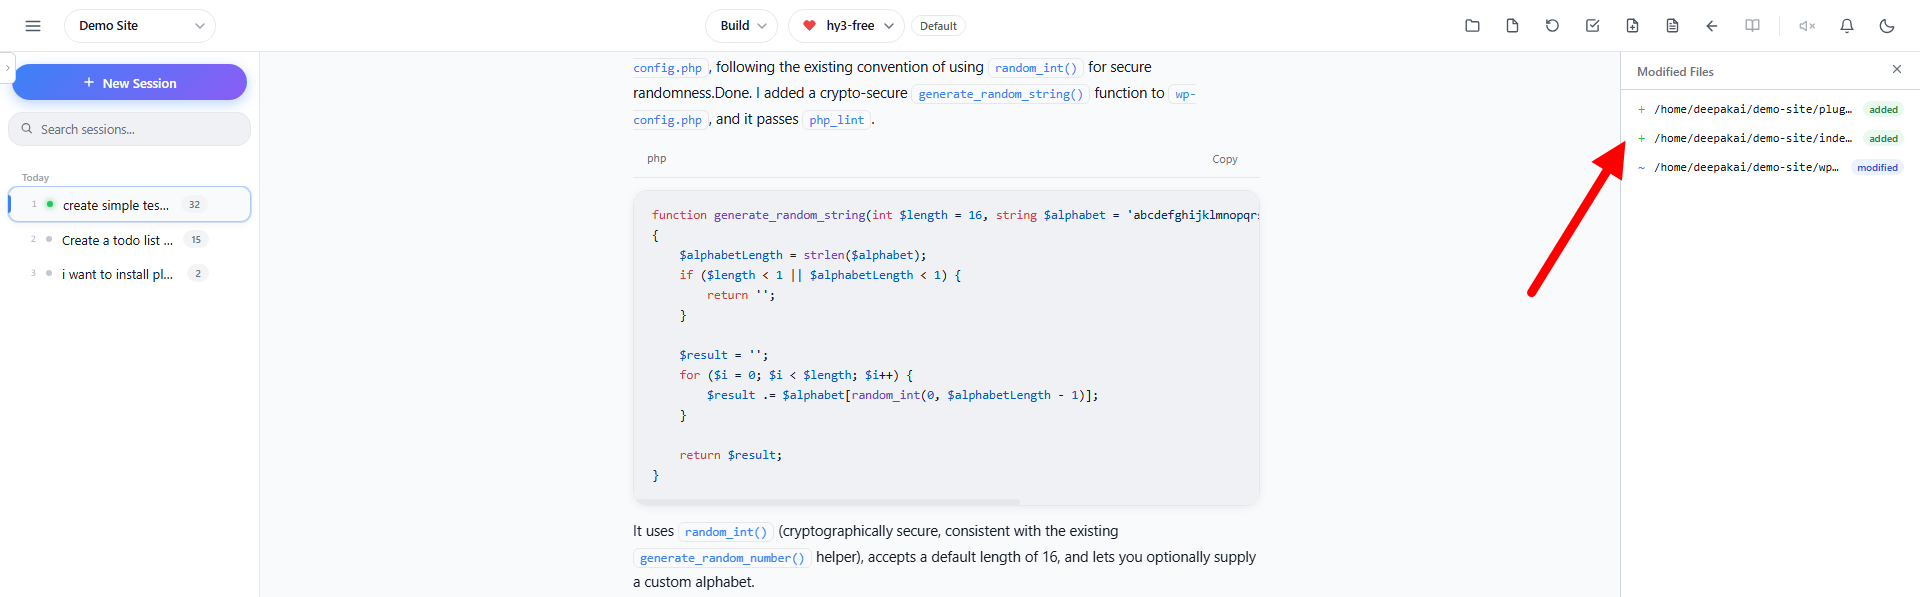
Click the Modified Files button in the header to see a list of all files that the AI has written, edited, or deleted during the current session.
- Green badge (added) – New files created by the AI
- Blue badge (modified) – Existing files edited by the AI
- Red badge (deleted) – Files deleted by the AI
Changes (Snapshots)
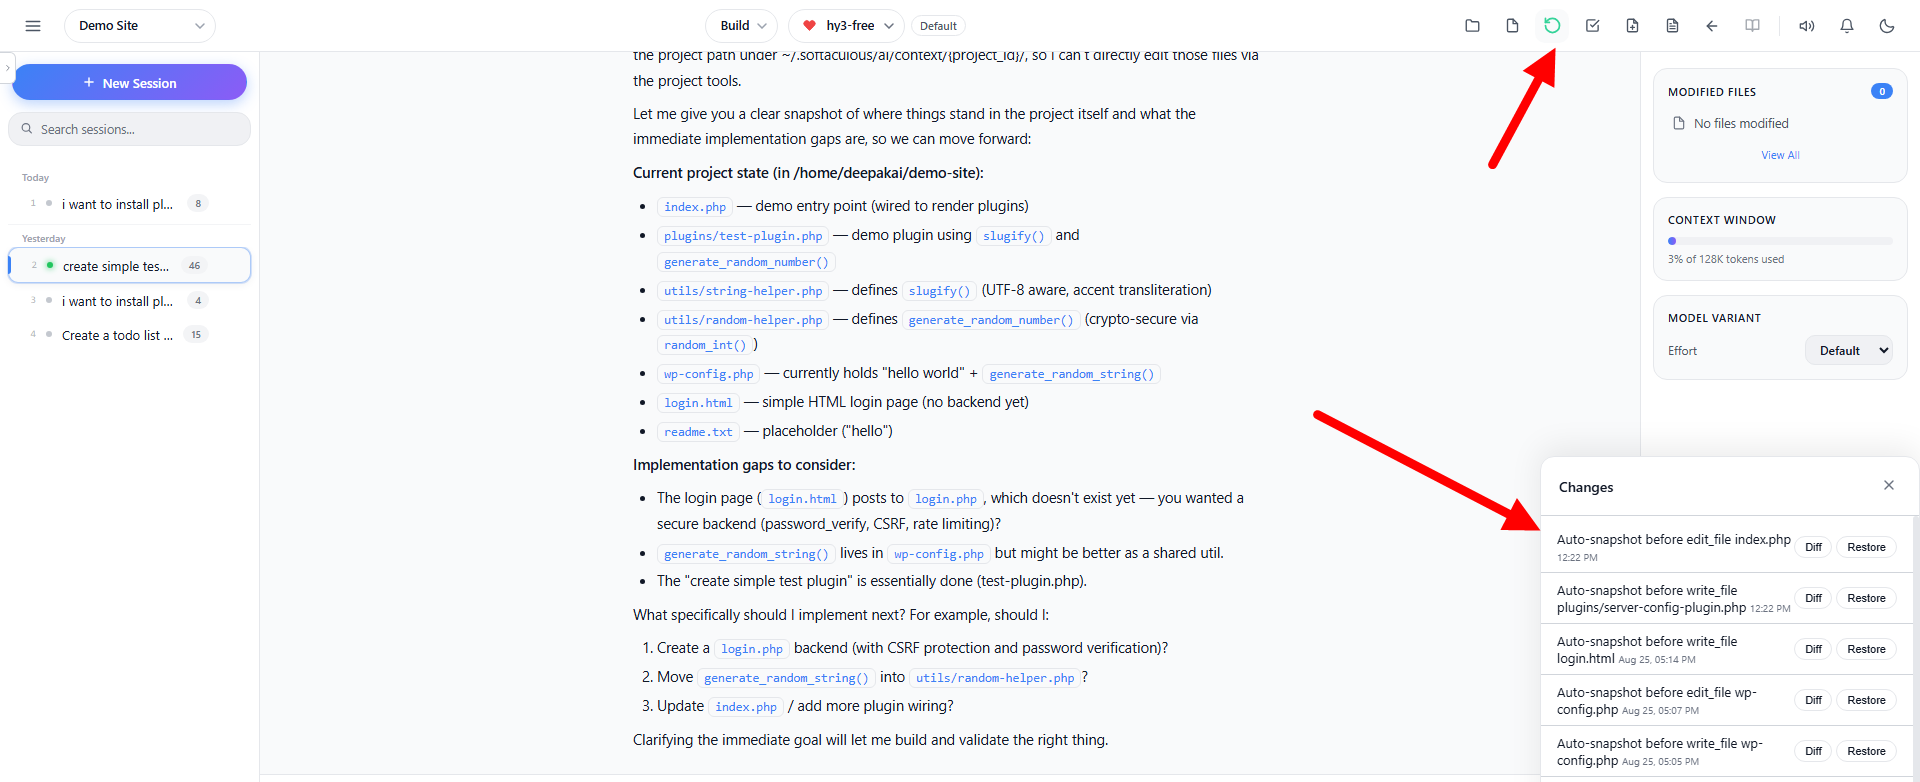
The Changes button in the header toolbar (⟲) opens the Changes panel, which shows a history of snapshots taken by the AI during the session.
- Each snapshot entry displays the snapshot message (e.g., “Auto-snapshot before write_file index.php”) and a timestamp
- Two actions are available per snapshot:
- Diff – Opens a diff viewer showing exactly what changed in that snapshot, with Unified and Split view modes
- Restore – Restores the project files to that snapshot’s state (with a confirmation dialog)
- Click the Changes button again or the ✕ close button to close the panel
File Viewer
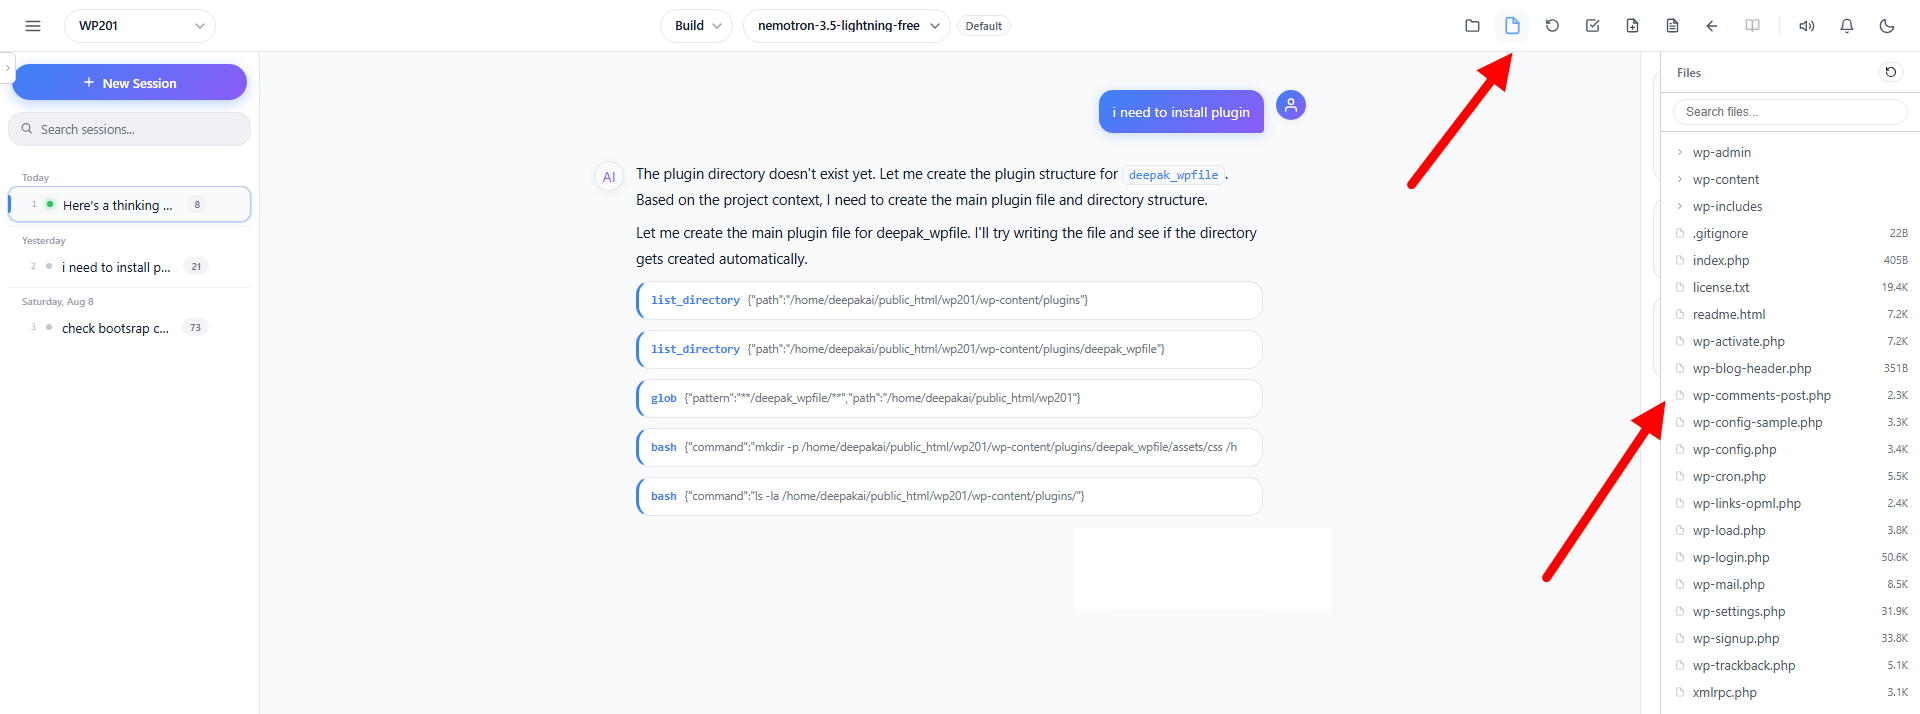
When you click a file in the File Tree, it opens in an inline File Viewer panel instead of leaving the interface.
- The viewer shows the file contents with syntax highlighting
- The file name is displayed in the viewer header
- Click the Files button again to close it
- This allows you to quickly inspect any file in your project without navigating away from the AI conversation
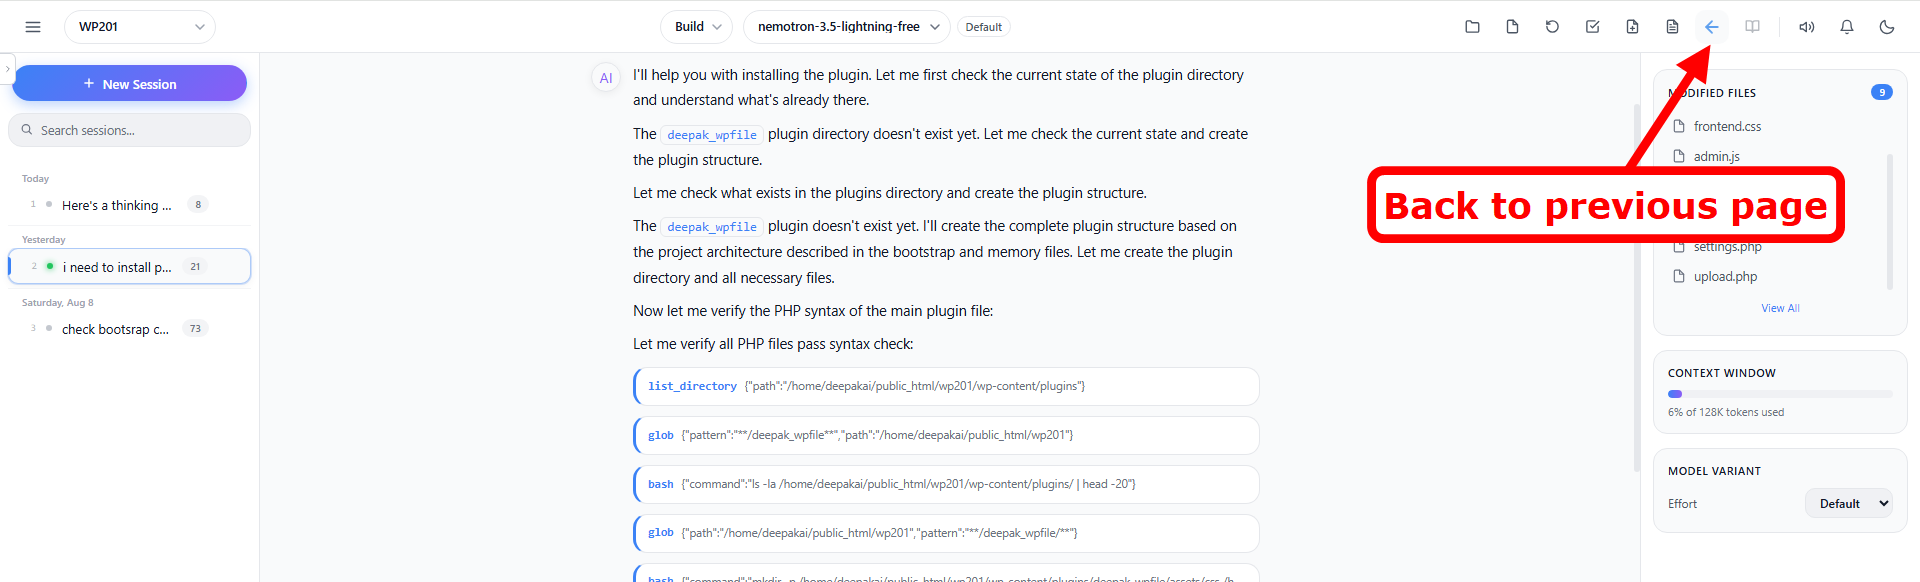
Back Button
When Code with AI is opened from within Softaculous (e.g., from an wordpress manager page), a Back button (←) appears in the header toolbar.
- Click the Back button to return to the previous Softaculous page
- This button only appears when there is a back URL available (e.g., when navigating from an installation’s Code with AI link)
- It is hidden when Code with AI is opened directly
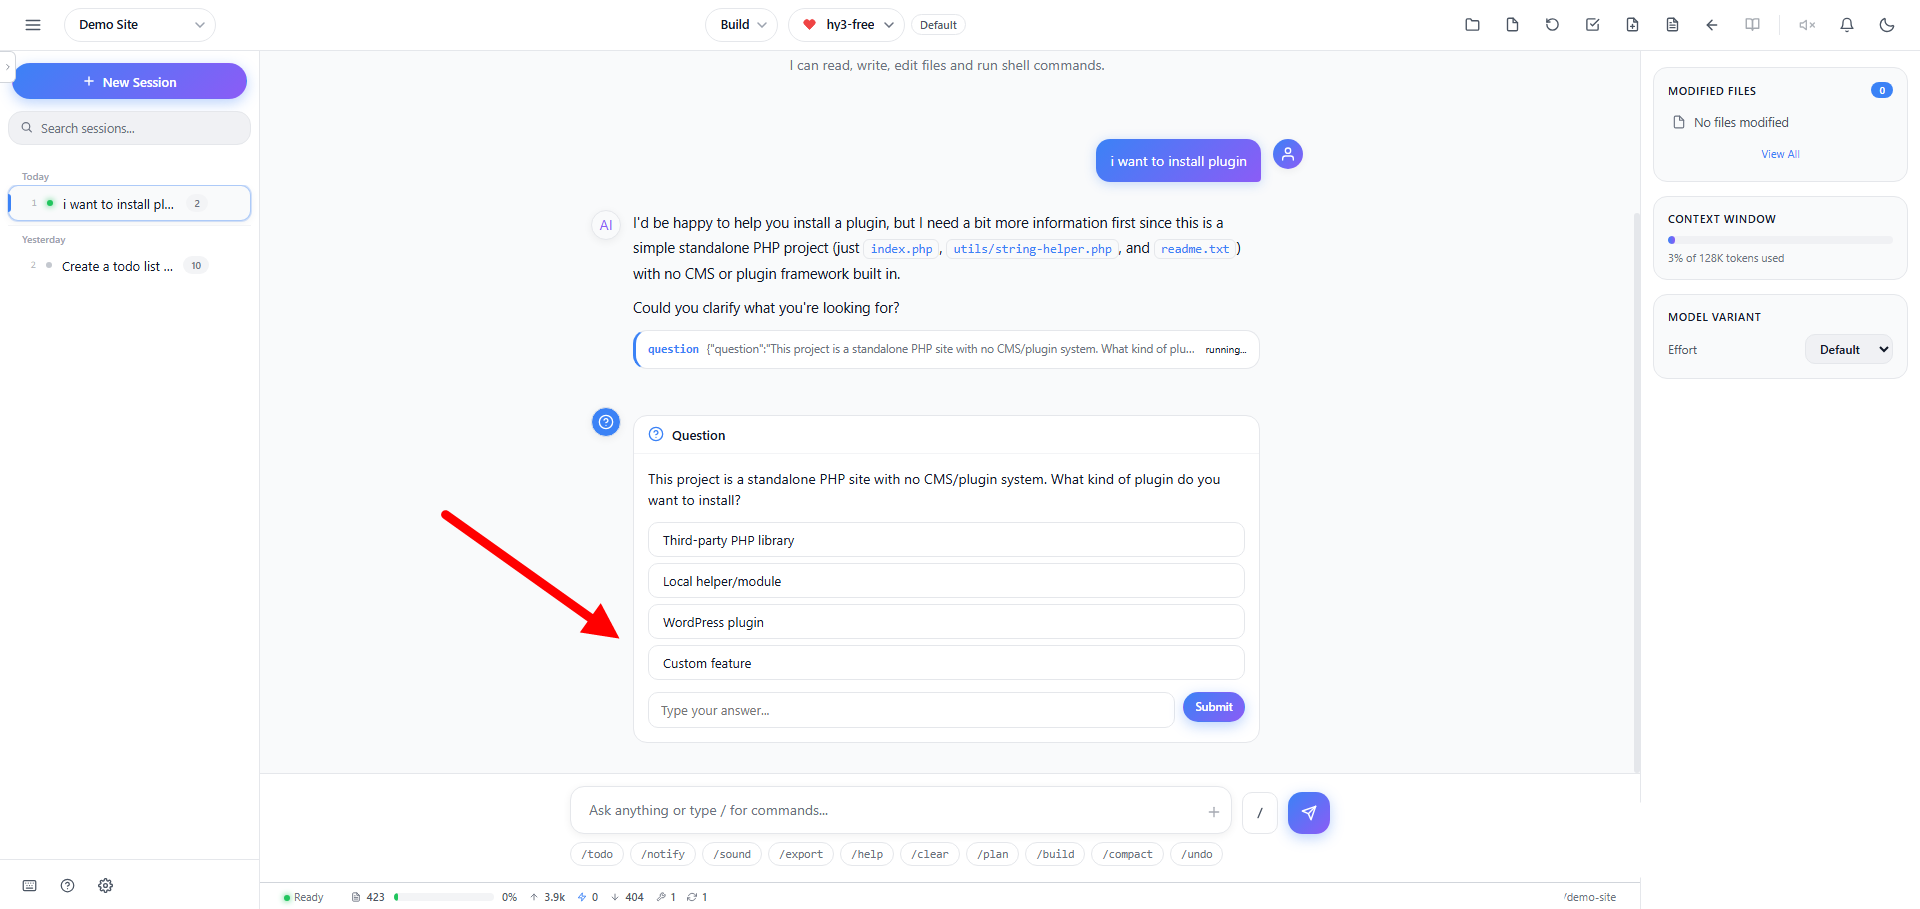
Interactive Question Cards
When the AI needs clarification or a decision from you before continuing, it pauses and displays an interactive question card directly in the conversation:
- The card shows the question with a ❓ header
- Predefined answer options appear as clickable buttons
- You can select multiple options if the question allows it
- A free-text field lets you type a custom answer
- The AI resumes working as soon as you answer
This keeps you in control: instead of guessing, the AI asks. A question chime (three rising notes) plays when a question arrives, and a browser notification can be shown if the tab is not focused.
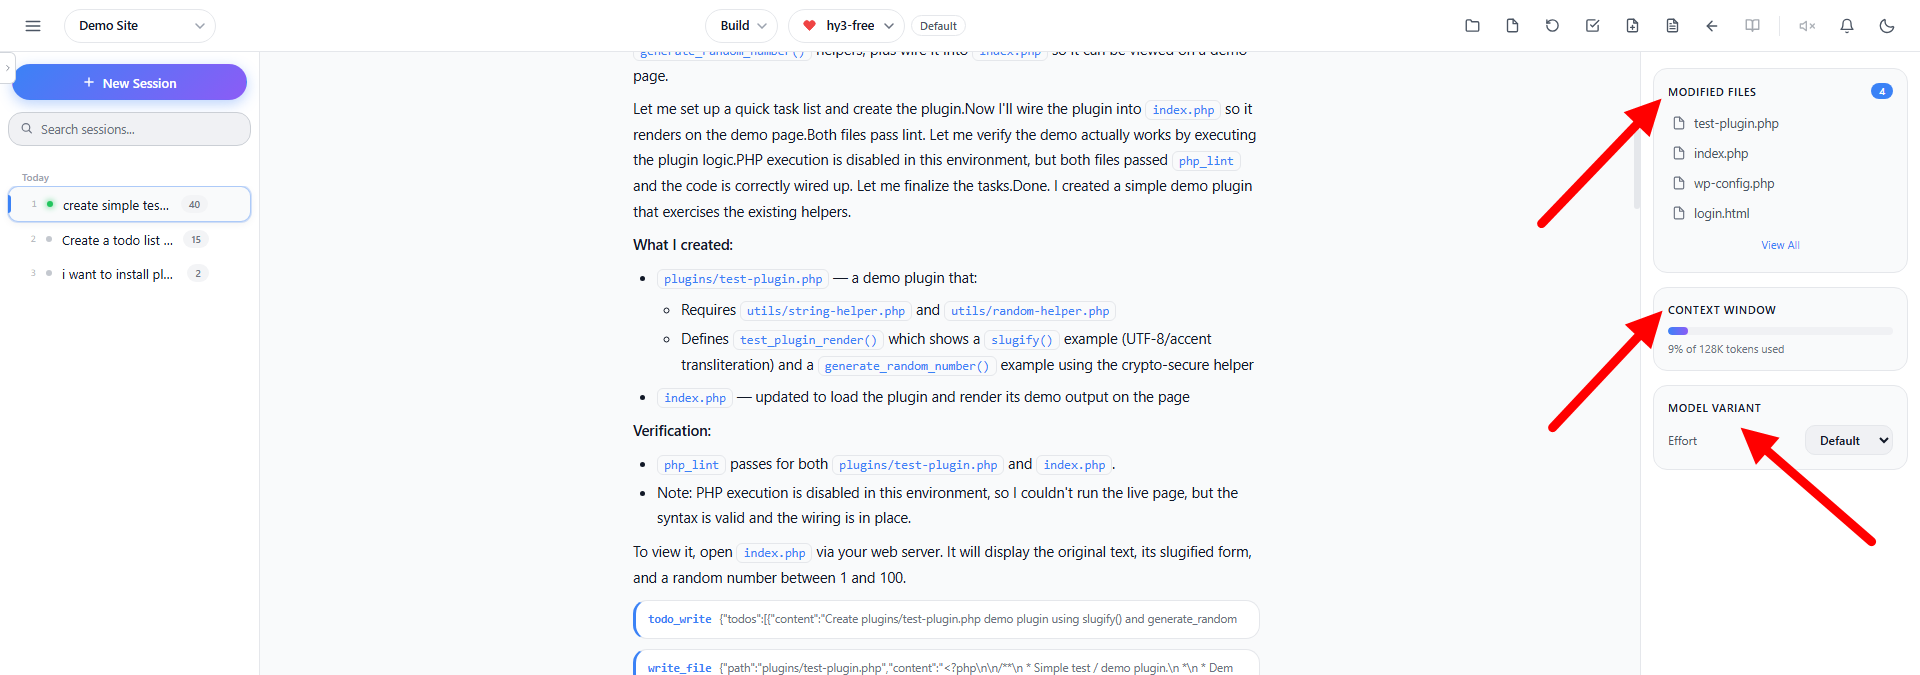
Right Side Panel
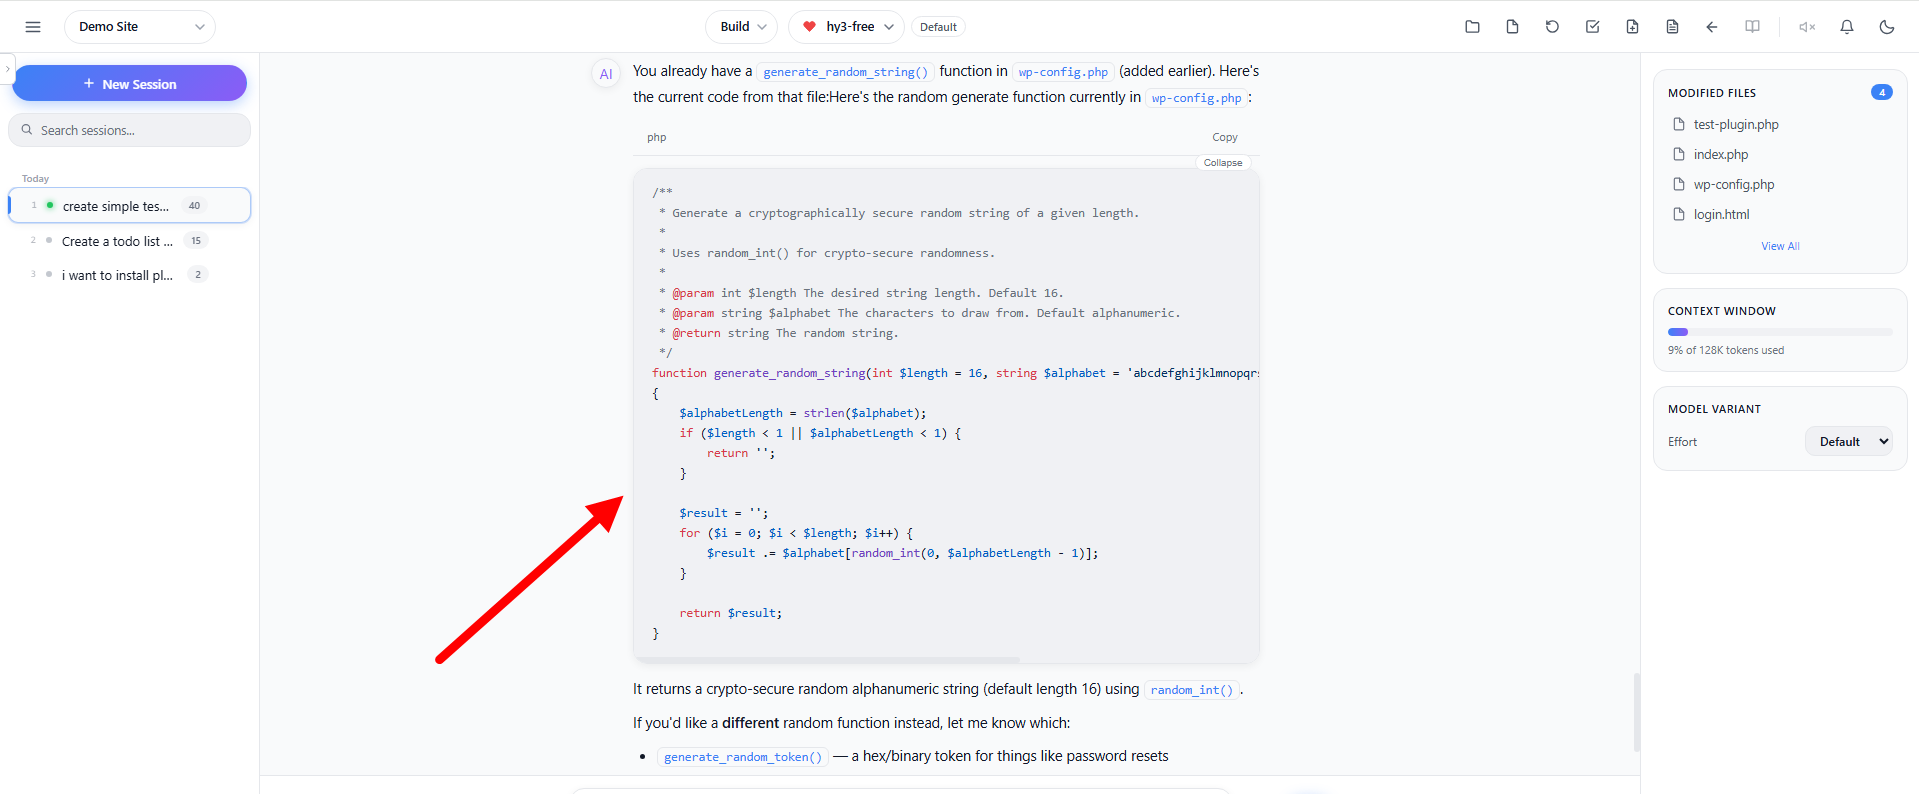
The Right Side Panel gives you quick, always-visible access to your modified files, context window usage, and model variant, so you can stay informed without interrupting your workflow.
The panel contains three cards:
- Modified Files – Shows the number of files changed by the AI in the current session, along with the latest modified files. Click View All to see the complete list.
- Context Window – A visual bar showing what percentage of the model’s context window has been used.
- Model Variant – Quickly switch the AI’s reasoning effort between Default, Low, Medium, and High without opening additional menus.
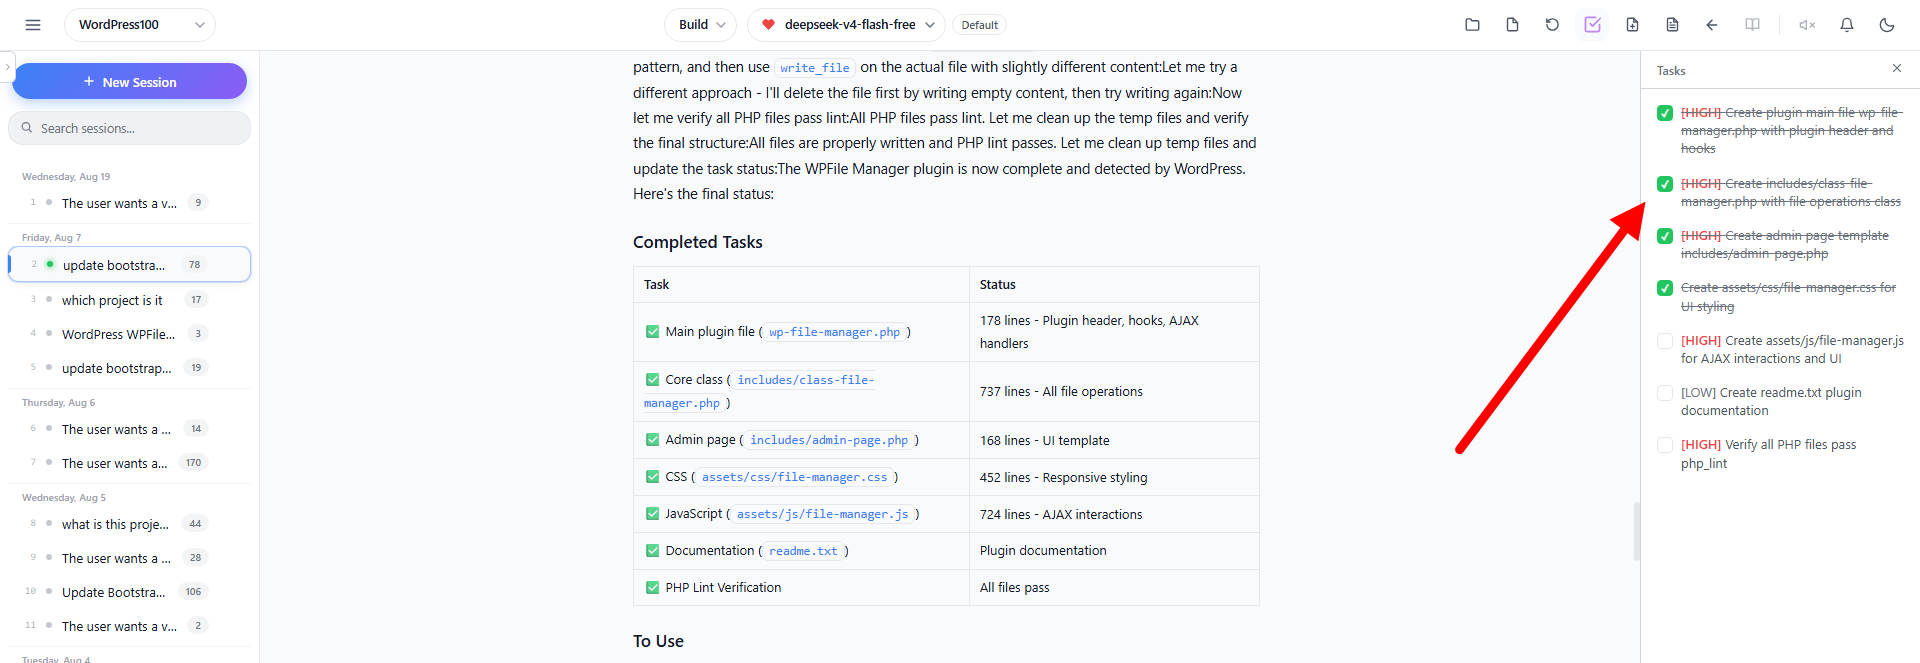
Task Management (Todo List)
Click the Tasks button in the header to open the task management panel. The AI can create and track tasks as it works on your project.
- Add tasks manually with
/todo <task text> - Click the checkbox to mark tasks as done/undone
- Tasks are persisted in the browser and saved per-session
Browser & Sound Notifications
Browser Notifications
Get browser notifications when the AI finishes responding, even when the tab is not focused.
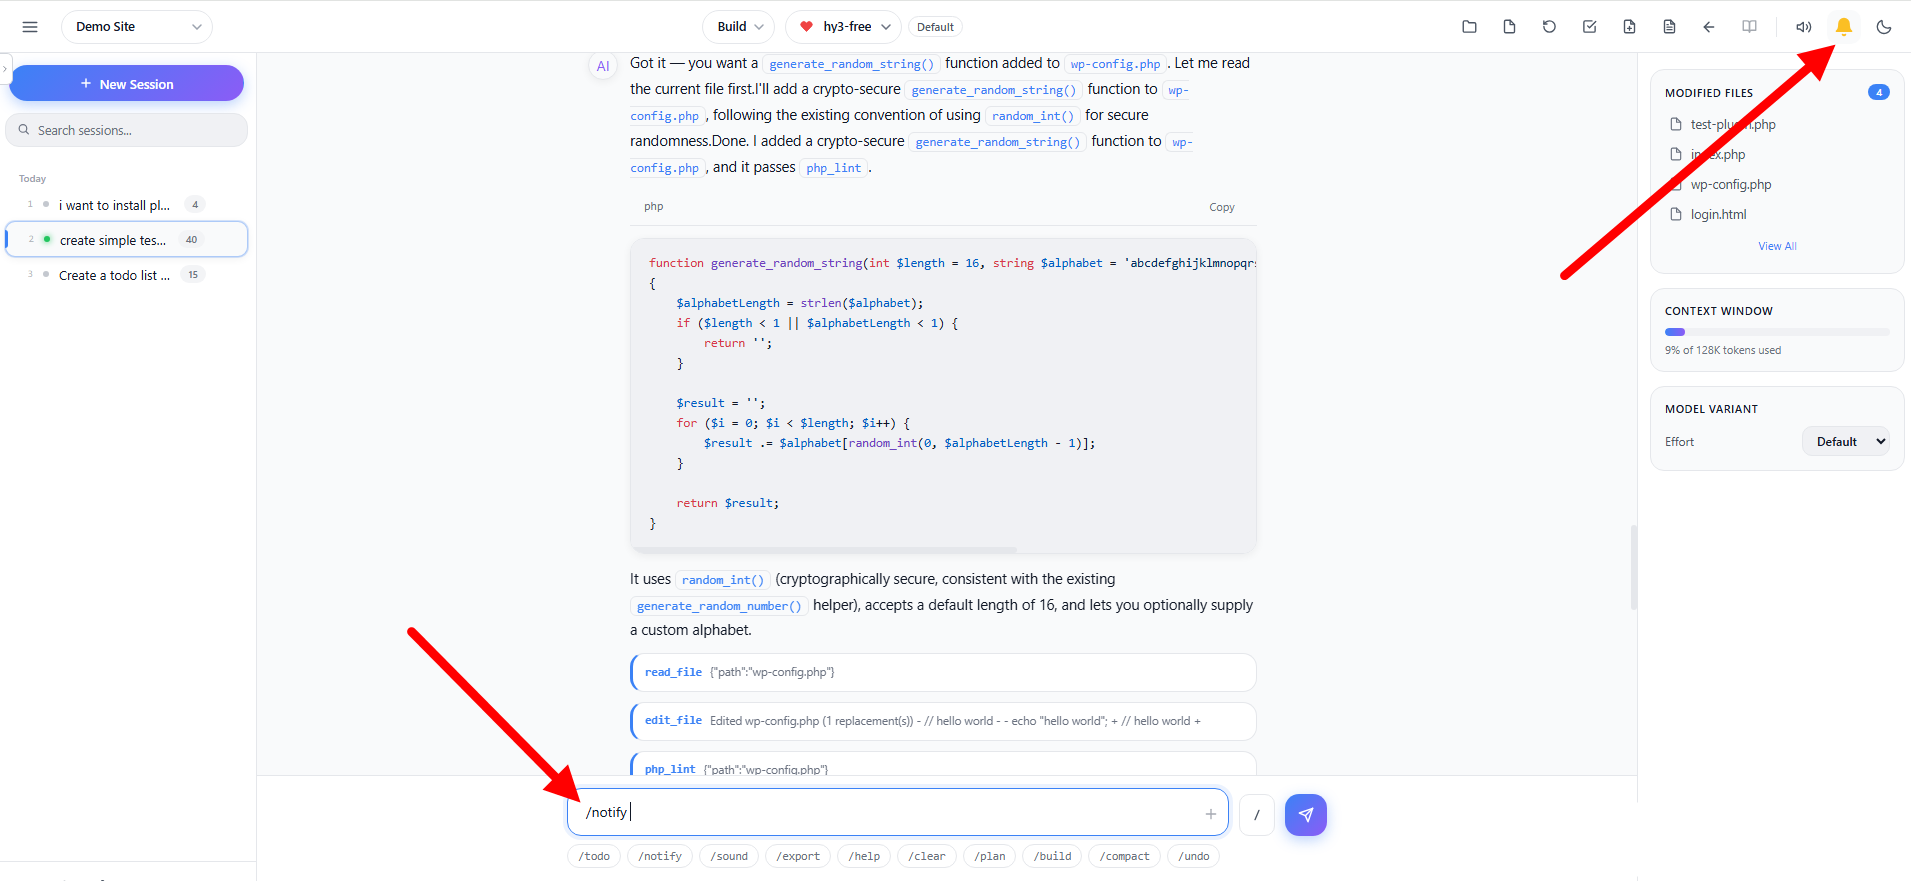
A bell icon in the header toggles browser desktop notifications on and off.
- Click the bell icon to turn desktop notifications on or off
- The first time you enable it, your browser will prompt for notification permission
- When enabled: the bell appears at full opacity with no strikethrough
- When disabled: the bell shows a diagonal line through it and dims to 45% opacity
- When the AI finishes responding while the tab is in the background, a desktop notification pops up, clicking it focuses the browser tab
- Toggle with
/notifyslash command, Alt+Shift+D shortcut, or the bell icon in the header
Sound Notifications
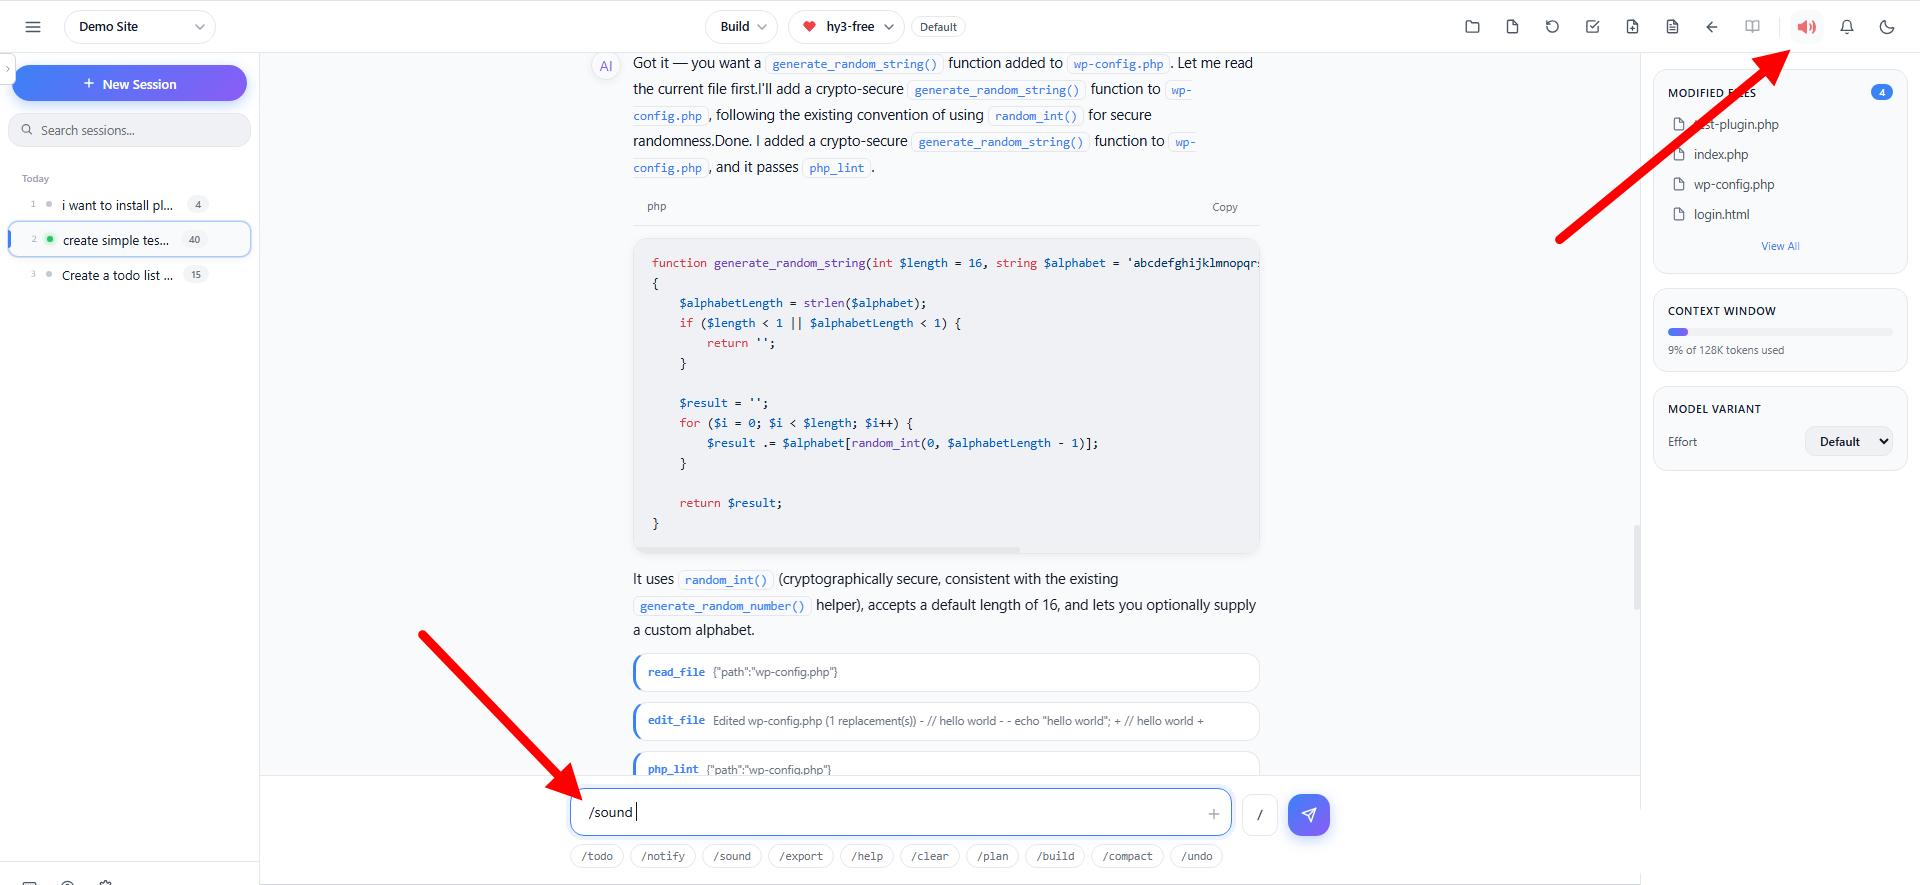
A speaker icon in the header toggles audio chimes on and off. Sound notifications are enabled by default.
- Click the speaker icon to turn sound on or off
- Your preference is saved and persists across sessions
- When enabled: the speaker shows sound waves at full opacity; tooltip reads “Mute sound”
- When disabled: the speaker shows an X line through it and dims to 45% opacity; tooltip reads “Unmute sound”
- Sound is generated via the Web Audio API (no external audio files needed) with three distinct chimes:
- Completion chime – Ascending tones when the AI finishes
- Error chime – Descending tones on errors
- Question chime – Three rising notes when the AI asks a question
- Toggle with
/soundslash command, Alt+Shift+O shortcut, or the speaker icon in the header
Keyboard Shortcuts
Code with AI supports a comprehensive set of keyboard shortcuts for efficient navigation:
| Shortcut | Action |
|---|---|
Ctrl+K | Open command palette |
Ctrl+Shift+V | Cycle model variant (reasoning effort) |
Alt+1 – Alt+99 | Switch to session 1–99 |
Alt+Shift+N | New session |
Alt+Shift+P | Switch to Plan mode |
Alt+Shift+B | Switch to Build mode |
Alt+Shift+S | Open Settings |
Alt+Shift+L | Toggle sidebar |
Alt+Shift+F | Toggle file tree panel |
Alt+Shift+T | Toggle tasks panel |
Alt+Shift+M | Toggle modified files panel |
Alt+Shift+C | Compact conversation |
Alt+Shift+E | Export as Markdown |
Alt+Shift+X | Clear conversation |
Alt+Shift+H | Open Help & FAQ |
Alt+Shift+O | Toggle sound notifications |
Alt+Shift+D | Toggle browser notifications |
Alt+Shift+K | Customize keybindings |
Alt+Shift+Y | Copy transcript |
Escape | Stop streaming / Close modals |
Enter | Send message |
Shift+Enter | New line in input |
| ↑ (at start of input) | Previous prompt in history |
| ↓ (at end of input) | Next prompt in history |
! (at start of input) | Shell mode prefix |
Customizable Keybindings
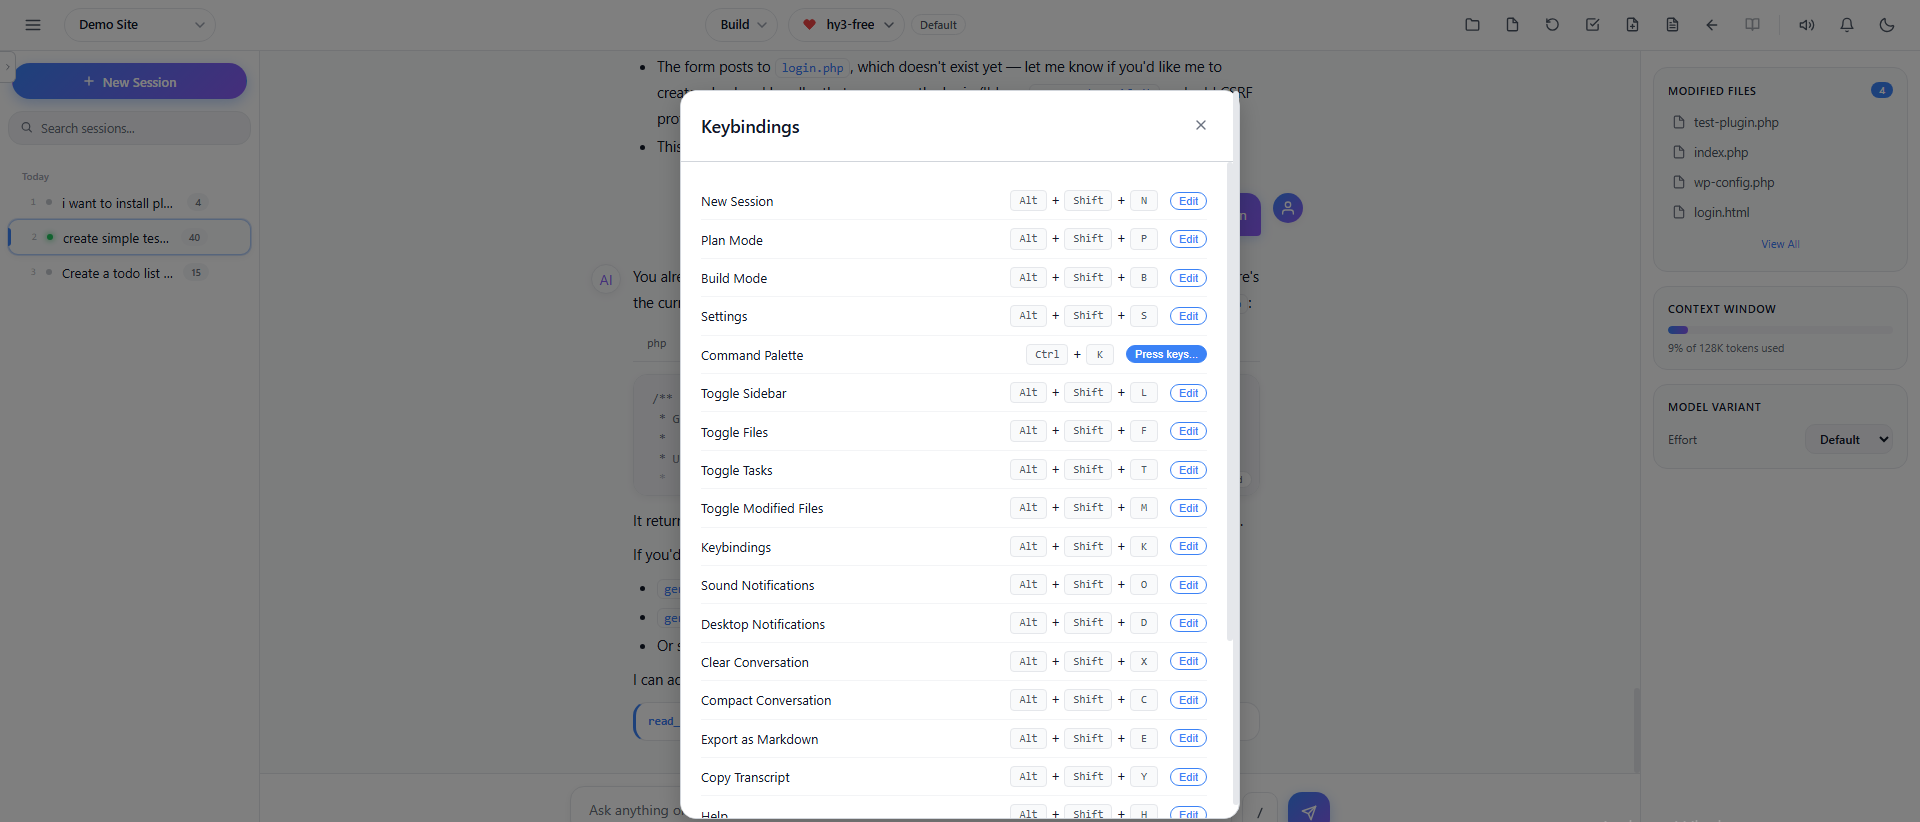
All keyboard shortcuts can be customized to your preference:
- Press
/keybindingsorAlt+Shift+Kto open the keybindings settings, or click on Keyboard Shortcuts(⌨️) to open the Keybindings settings - Each shortcut is displayed with its current key combination
- Click Edit next to any shortcut
- Press your desired key combination
- The new binding is saved automatically
- Click Reset to Defaults to restore all shortcuts
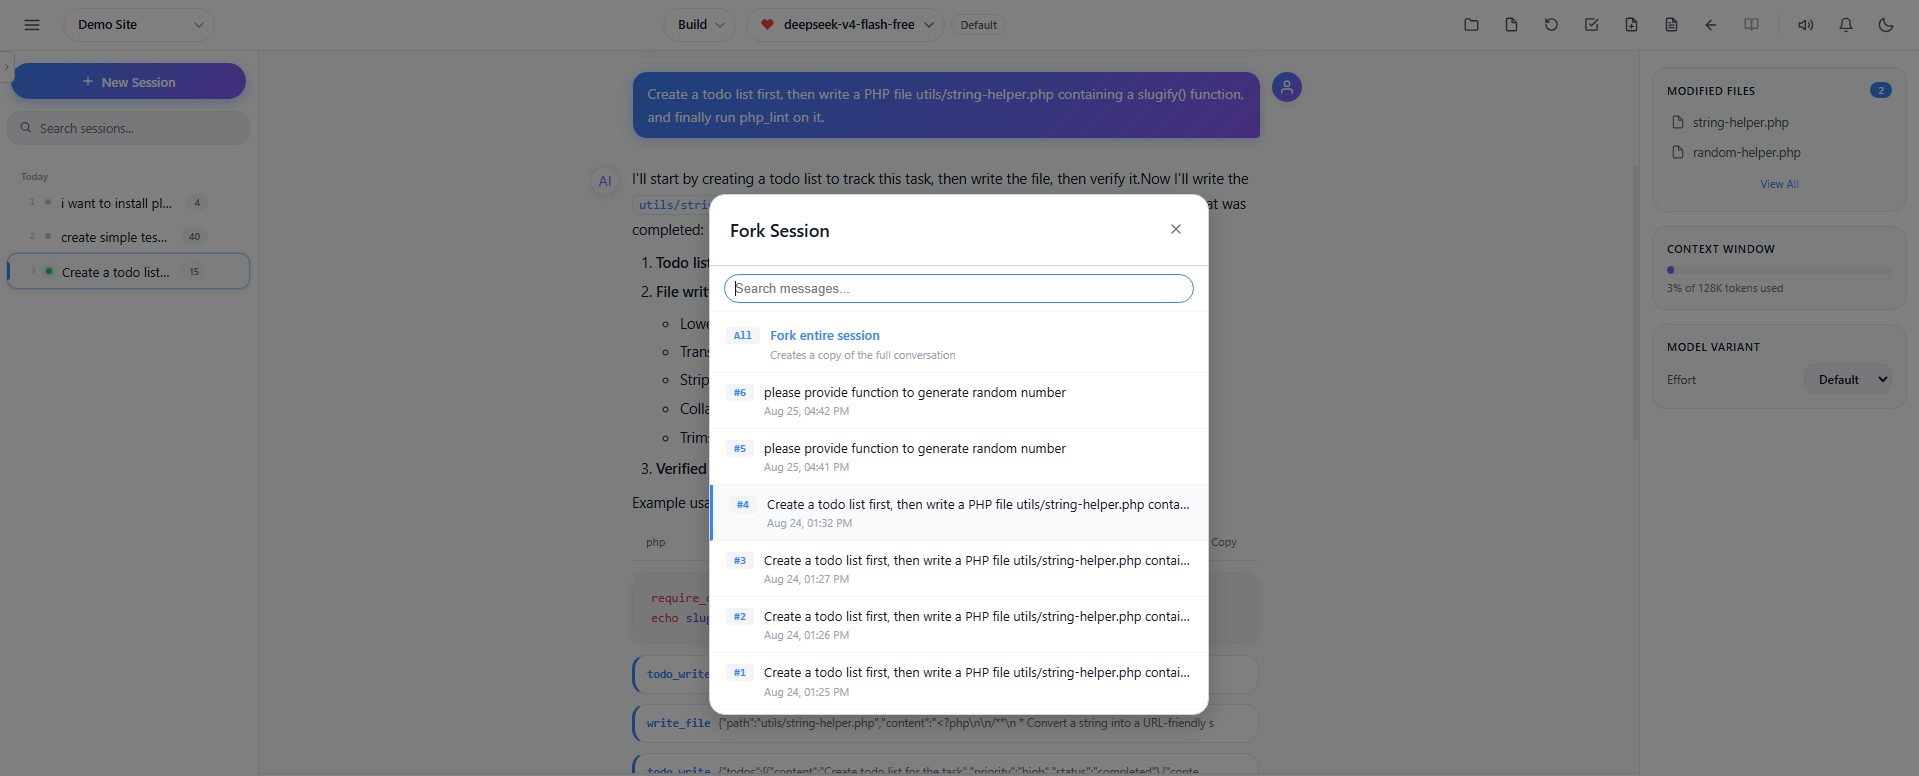
Conversation Fork / Branch
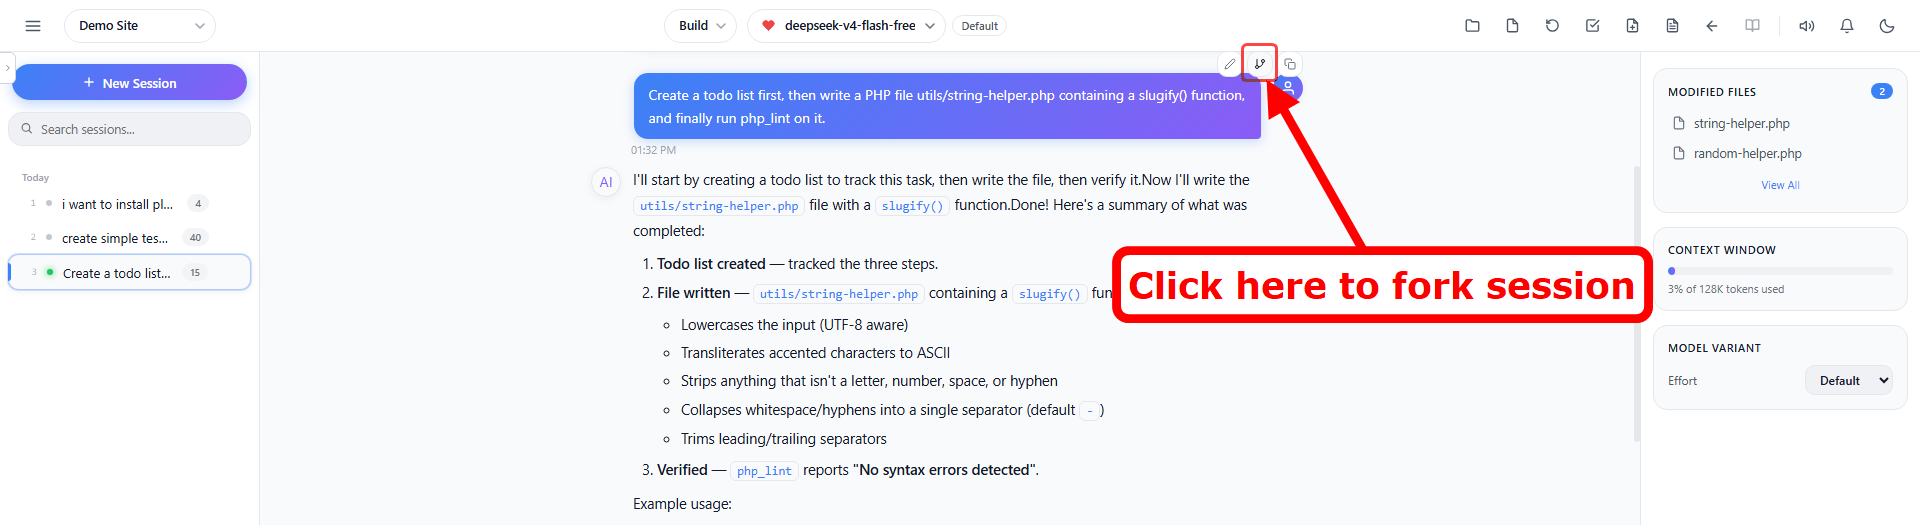
Fork a conversation to explore an alternate path without losing your current chat:
- Type
/forkor pressCtrl+Kand select Fork Conversation - A modal shows all user messages in the conversation
- Click Fork entire session to copy the full conversation, or click a specific message to fork from that point
- A new session is created with all messages up to the fork point
- The forked session gets its own title and can be edited independently
Session Compact & Summarize
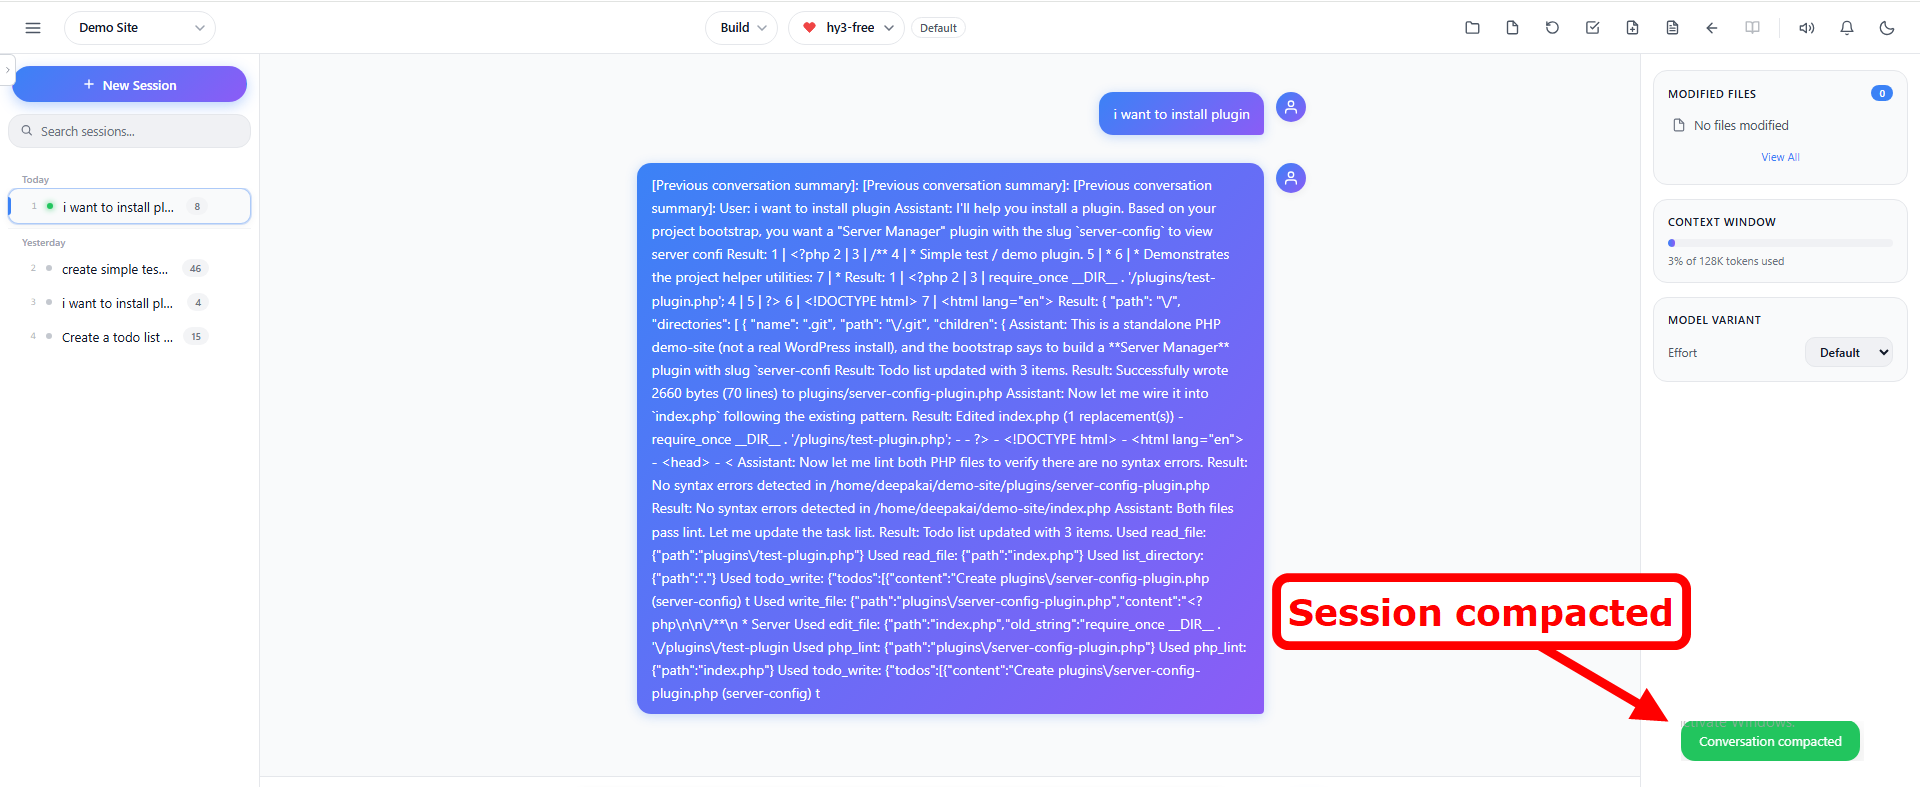
When your conversation gets long, compact it to reduce token usage:
- Type
/compactor pressAlt+Shift+C - The AI summarizes earlier messages while keeping the most recent 3 messages intact
- This reduces context usage and keeps the conversation within the model’s context window
Undo / Redo Messages
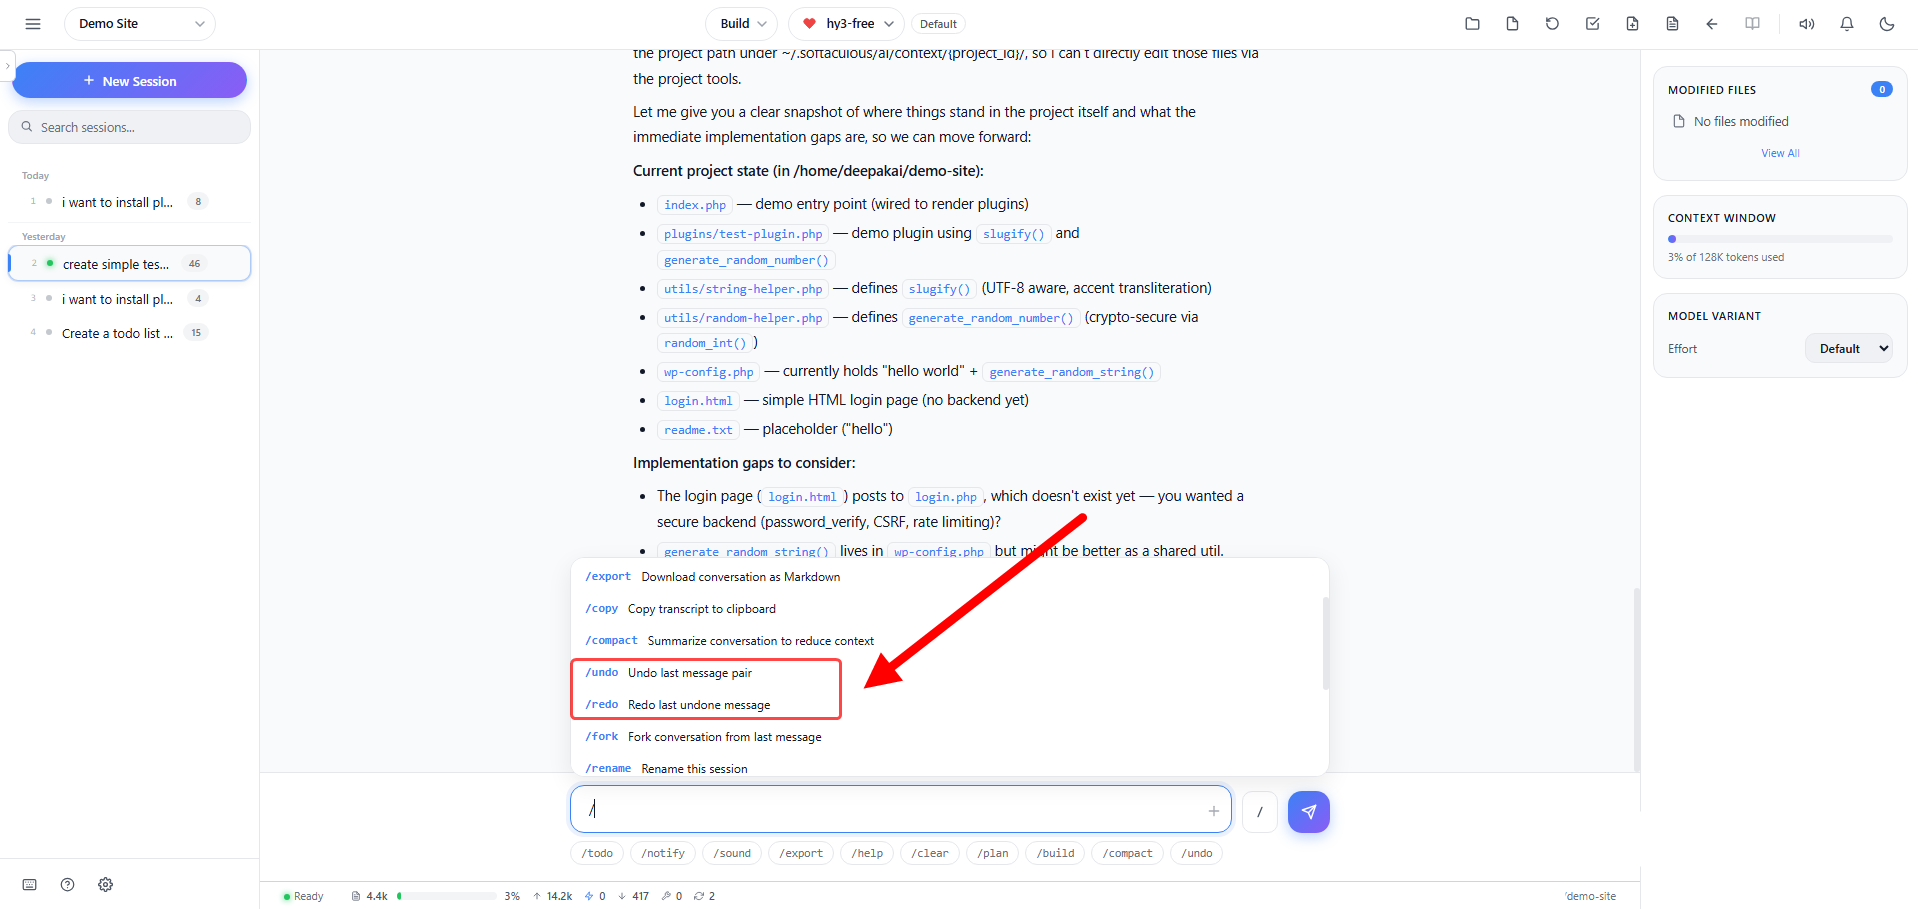
Made a mistake or want to rephrase? Use undo and redo:
- Undo (
/undo) – Removes the last user message and all responses after it - Redo (
/redo) – Restores the last undone message pair - You can undo multiple times to go back through the conversation
Regenerate Response
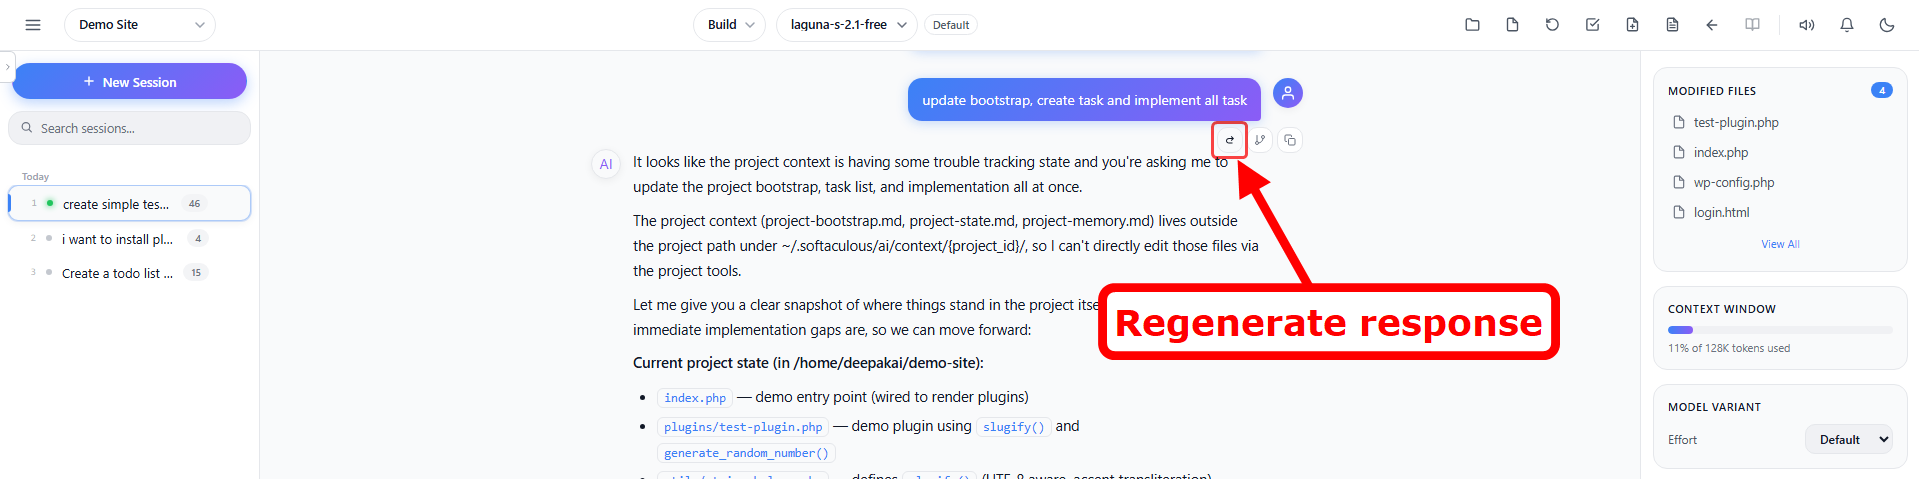
If you’re not satisfied with the AI’s response, you can regenerate it:
- Hover over the last assistant message
- Click the regenerate button (circular arrow icon) that appears
- The AI will generate a new response to your last message
- Useful for getting alternative approaches or fixes
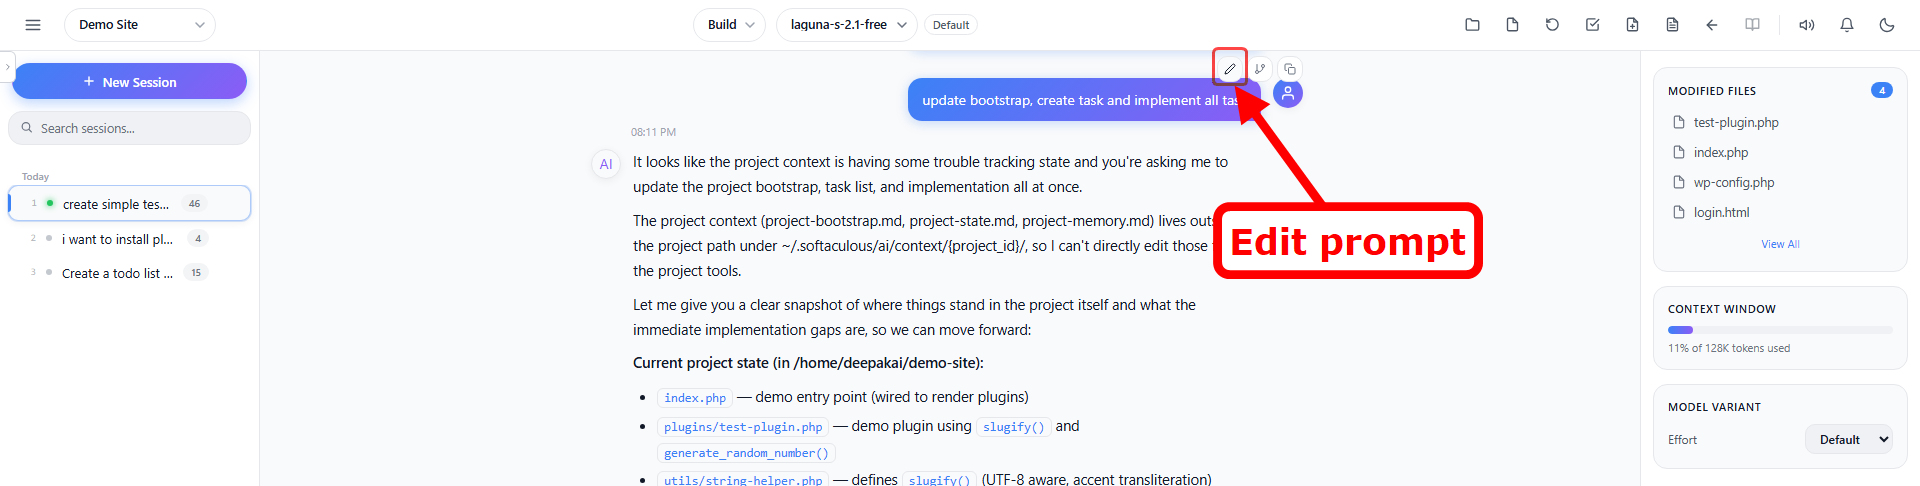
Edit Previous Messages
You can edit any previous user message and re-submit it:
- Hover over any user message in the conversation
- Click the pencil icon (🖉) that appears
- Edit the text inline
- Click Send to submit the edited message
The edited message is sent as a new prompt. Existing messages are preserved below it.
Export Conversation
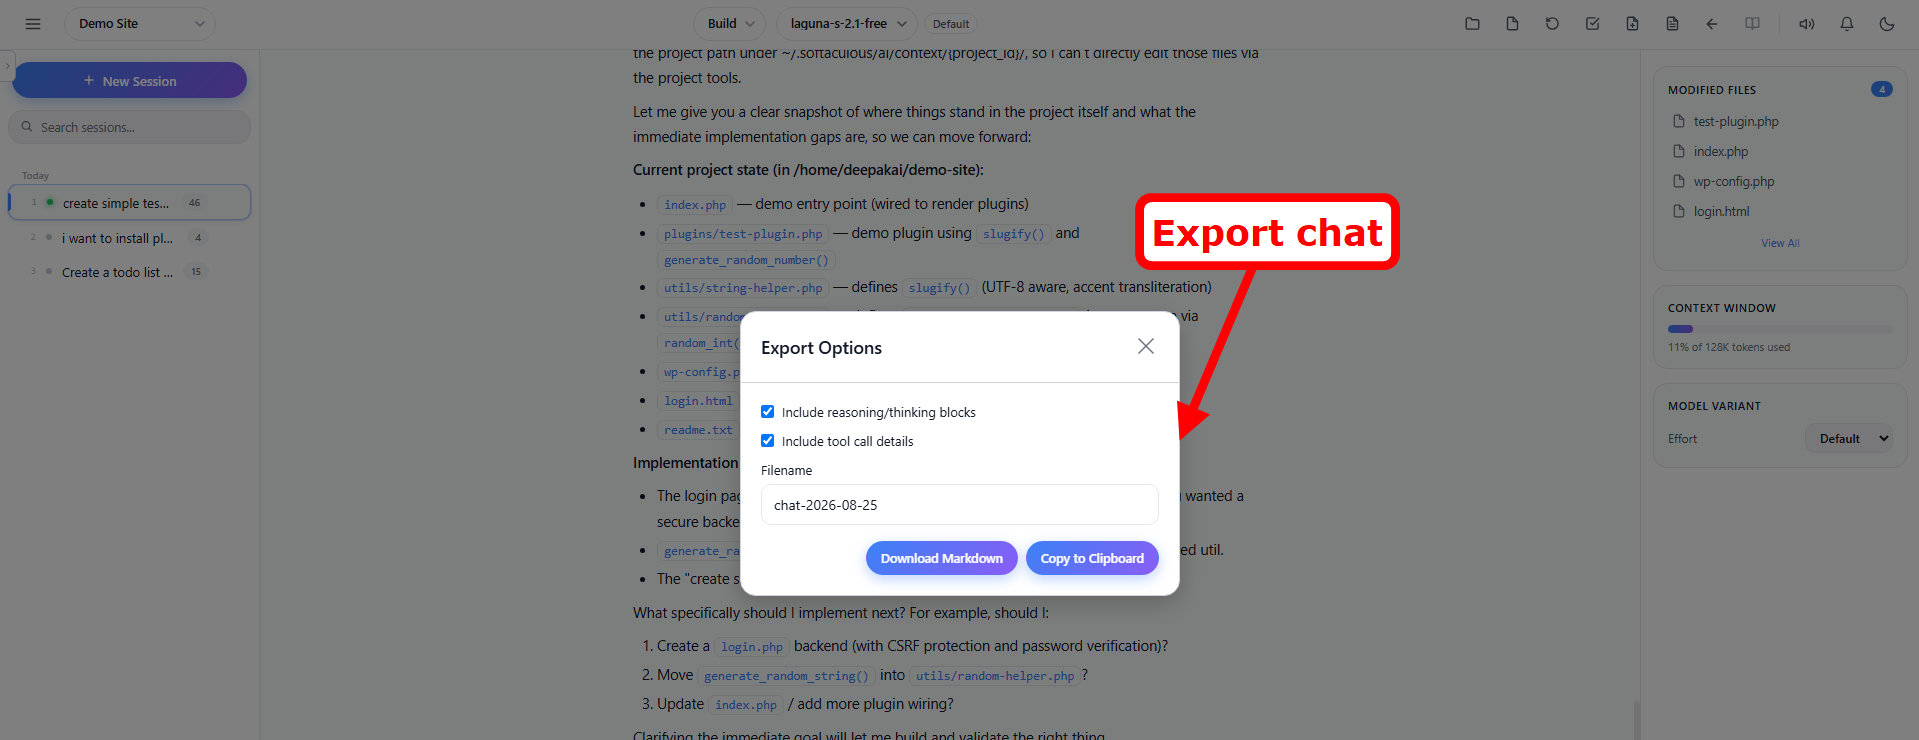
Export your conversation for documentation or sharing:
- Export as Markdown (
/export) – Downloads a complete Markdown file with all messages, including reasoning blocks, tool calls, and code blocks - Copy to Clipboard (
/copy) – Copies the full transcript to your clipboard - Both options include the full conversation with proper formatting
Prompt History Navigation
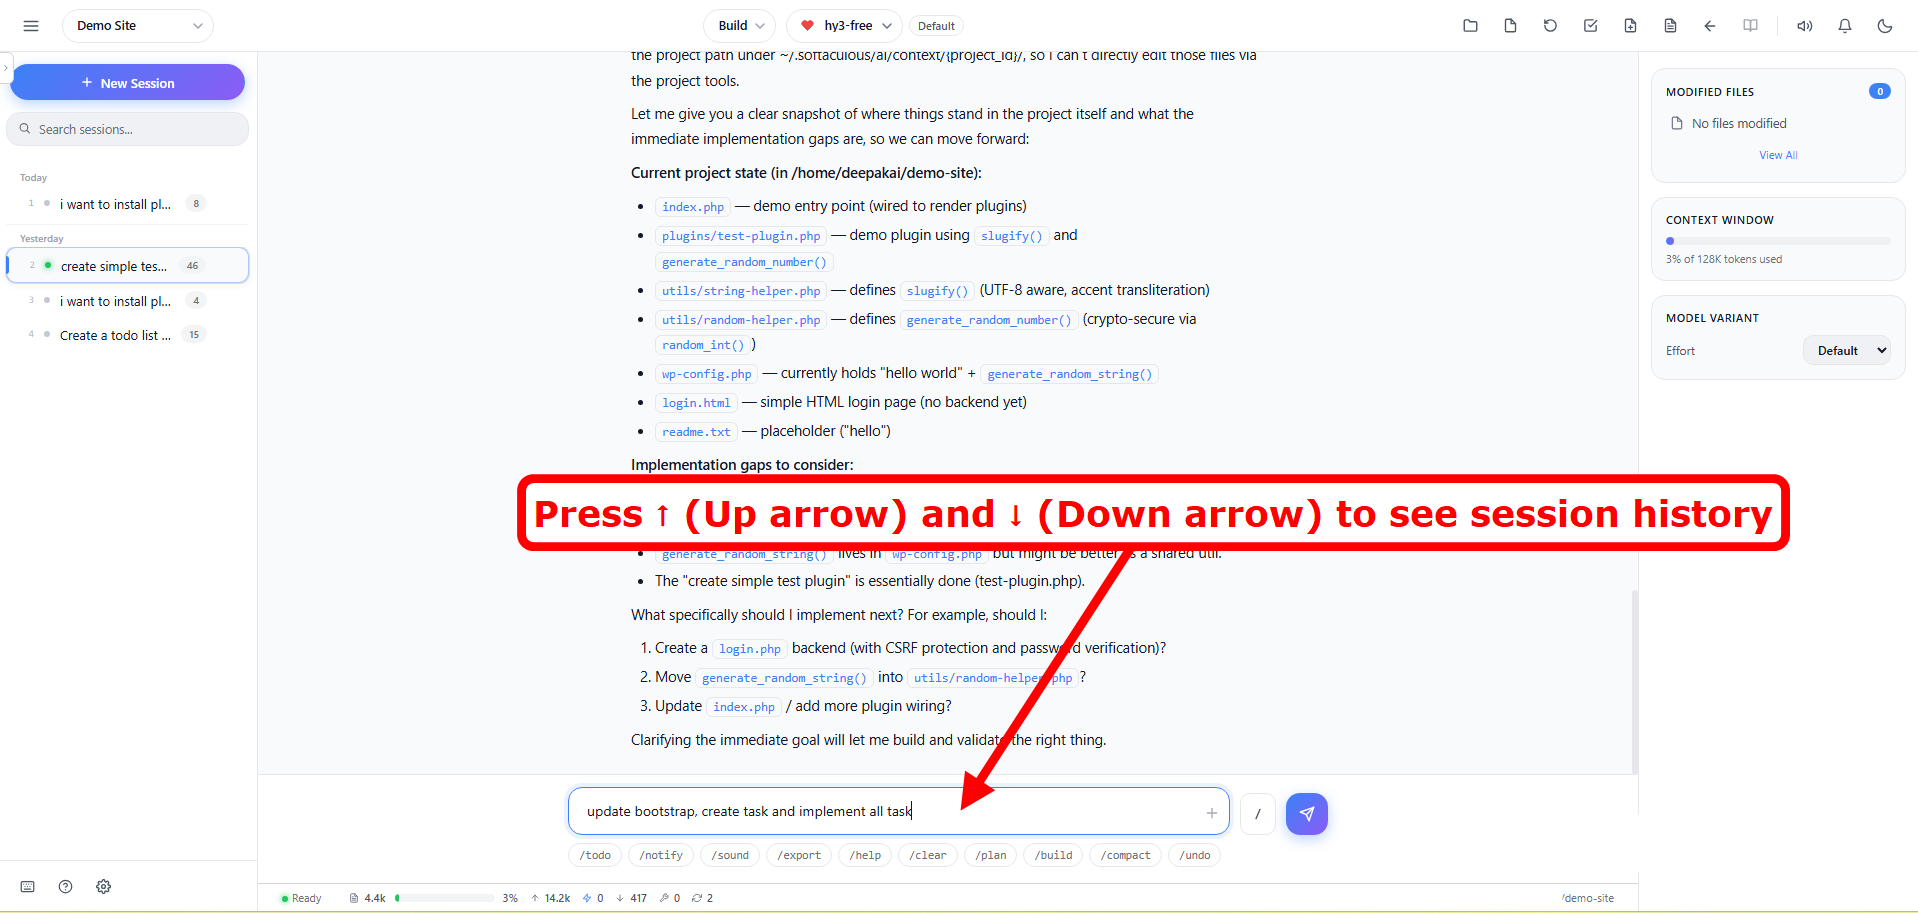
Quickly access and re-use your previous prompts:
- Press ↑ (Up arrow) at the start of the input to cycle through previous prompts
- Press ↓ (Down arrow) to move forward in history
- Or use
Ctrl+↑/Ctrl+↓to cycle history at any cursor position - Prompt history is saved per-session and persists across browser sessions
Help & FAQ
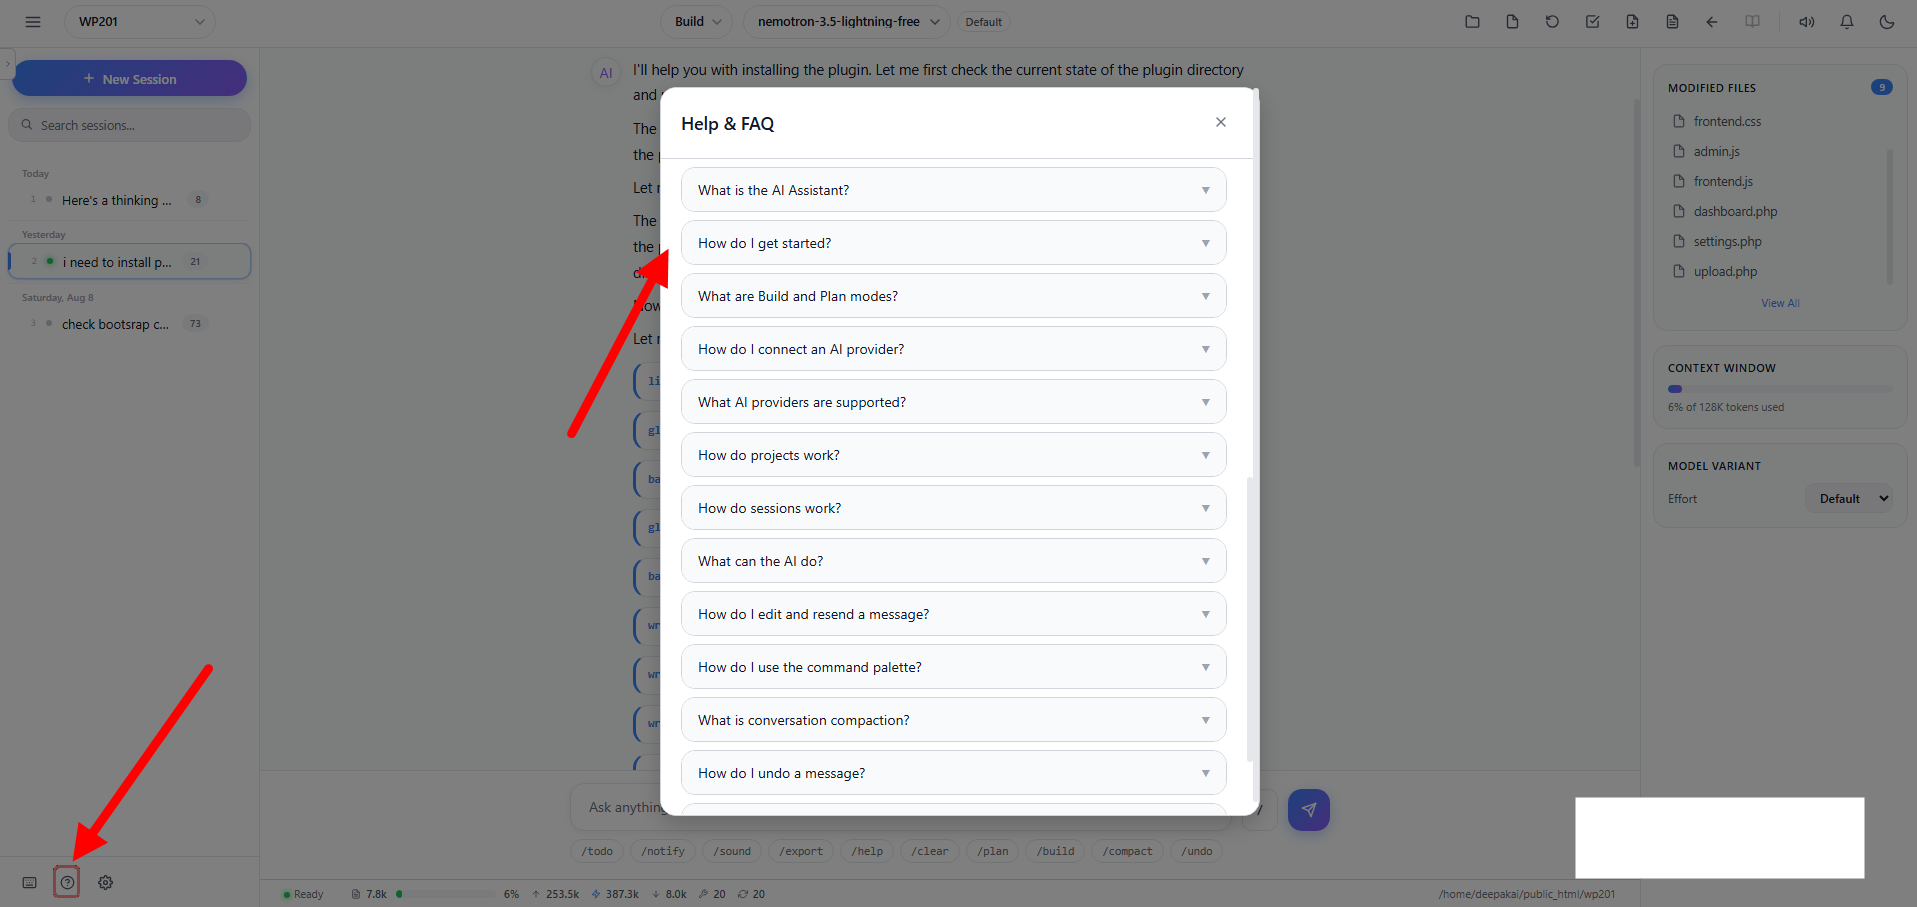
A Help icon (❔) is available in the sidebar footer. Click it to open the Help & FAQ modal.
- The modal displays frequently asked questions and answers about Code with AI
- Topics include: how projects work, keyboard shortcuts, slash commands, shell mode, and more
- Click the ✕ close button or click outside the modal to close it
Best Practices
When to Use Build Mode
- Writing new code
- Fixing bugs
- Refactoring existing code
- Running commands to set up your project
- Making configuration changes
When to Use Plan Mode
- Reviewing code before making changes
- Understanding complex code
- Planning architectural changes
- Getting explanations of how code works
- Analyzing potential issues
Writing Effective Prompts
- Be specific about what you want the AI to do
- Provide context about your project structure
- Mention file names when referring to specific files
- Break complex tasks into smaller steps
- Review AI changes before accepting them
Session Organization Tips
- Use descriptive session names (rename with
/rename) - Fork conversations when exploring different approaches
- Compact long sessions to stay within context limits
- Use Plan mode for exploration and Build mode for implementation
- Create separate projects for different codebases
Security Considerations
- Review all file changes before applying them
- Don’t share sensitive API keys or passwords in chat
- Use Plan mode when exploring unfamiliar code
- The AI will never reveal API keys, credentials, or secrets
- Tool isolation ensures the AI can only access allowed directories
Troubleshooting
AI Provider Connection Issues
Problem: Cannot connect to AI provider.
Solutions:
- Verify your API key is correct
- Check if your API key has available credits/quota
- Use the “Test” button in Settings to verify connectivity
- Use OpenCode Zen (Free) if you don’t have an API key
AI Not Responding
Problem: Messages are not getting responses.
Solutions:
- Check your internet connection
- Verify the selected AI model is available
- Check if you’ve reached API rate limits
- Try switching to a different AI provider
File Access Issues
Problem: AI cannot read or write files.
Solutions:
- Verify the project directory path is correct
- Check file permissions on your server
- Ensure the directory exists and is accessible
- Try creating a new project with the correct path
Session Management
Problem: Cannot find previous conversations.
Solutions:
- Check the sidebar for previous sessions
- Use the search box to filter sessions
- Ensure you’re in the correct project
- Sessions are project-specific – switch projects if needed
Context Window Full
Problem: The AI stops responding or shows errors about context length.
Solutions:
- Use
/compactto summarize the conversation - Start a new session for a fresh context
- Use
/forkto continue from a specific point
Sound / Notification Not Working
Problem: No audio or browser notifications.
Solutions:
- Check
/soundstatus – ensure sound notifications are ON - Check
/notifystatus – ensure browser notifications are ON - Allow browser notifications when prompted
- Check browser settings for notification permissions